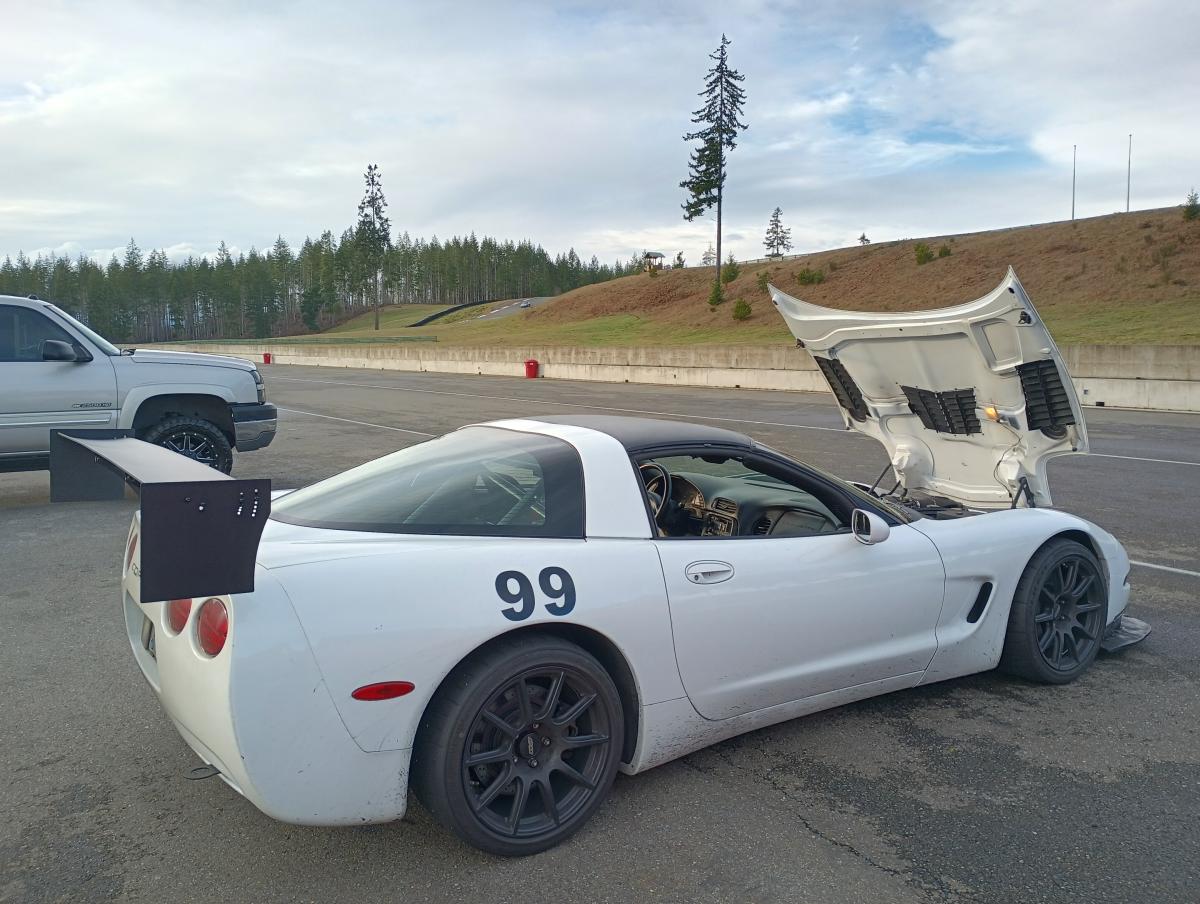
C5 Corvette Wing - The Enthusiasts DIY Way - Everything you need to do a chassis mounted wing yourself.
Do it Yourself. Built not Bought. Know your ride. Whatever the mindest is that drives you to want to tackle projects yourself, you're here because you're interested in doing a chassis mounted wing for your C5 Corvette on your own. Maybe it's because you're cheap and this is less than the current options that are out there, or maybe you like the aesthetics of what I did... or maybe you just think it's cool to do. Welp, whatever brought you here, you're here now and contained herein is just about everything you need to do the job yourself.
Let's Start with a warning before you proceed:

I am not an engineer. I have no qualifications to have designed this, and I'm definitely not qualified to sell this. I'm an idiot for having taken this to 140mph so many times.
You are proceeding at your own risk. This is a perfect opportunity to encourage you to instead consider that there are presumably engineered and tested products out there, many with local and national championships backing up the quality of the product. 9 Lives Racing makes a solid product with many championships behind their products and likely thousands of folks testing them, AJ Hartman knows his stuff as well. Folks like C7 Carbon and the folks at Faircloth Composites are all also top notch providers. Tway motorsports makes a custom upright with plates for wings as well, and so does AfterDarkSpeed. There are surely others who are more qualified than myself.
It is also worth noting that 9LR now offers a C5/6 DIY kit and it honestly costs as much as sourcing the parts we link here. So... unless you like something about my design better, I'd encourage you to go with their kit!
Consider yourself warned and you've been informed of all the alternatives I'm aware of!
The Jist of the DIY Wing
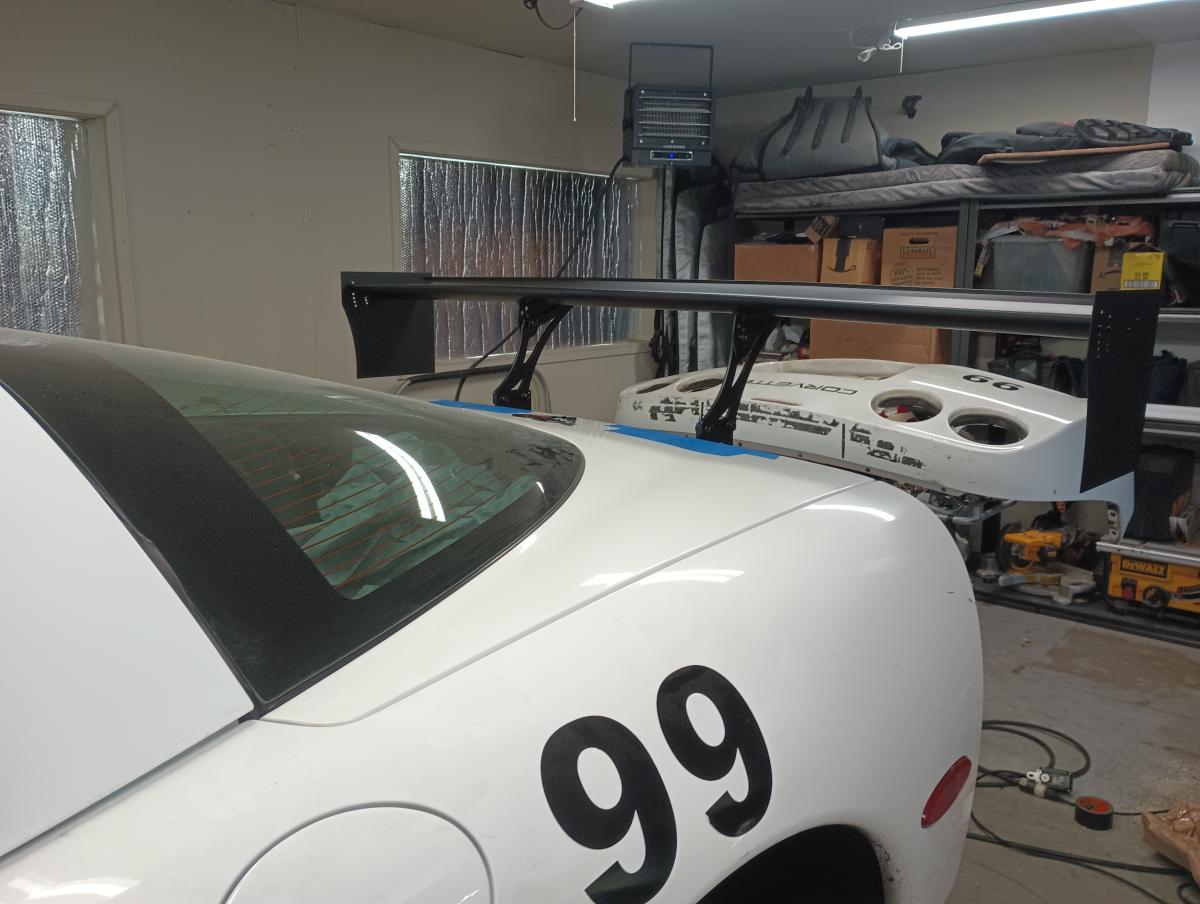
So you can read all about the development of my C5 Chassis mounted wing over at my excessively long blog post. The short version is, I had a "vision" (I'm not bright enough to use that word but it applies), the products out there didn't match, and I challenged myself to make what I wanted. I learned a ton about CAD in OnShape and working with SendCutSend and through a bunch of designing and iterative proprtyping, I succeeded. I've tested the wing now at the track and it works, and works well. Bonus points for it looking exactly as I wanted, which is where I felt most other wings fell short.
The DIY C5 Chassis Mounted Wing consists of aluminum plate ordered from SendCutSend, a smattering of nuts and bolts from Amazon, all of which is then assembled either by working with a local fabricator that can weld aluminum or by welding aluminum yourself if you have the know how and equipment. Beyond that, you will likely want to source a local powder coater, but eh maybe raw aluminum really does it for you or you see no need to pay for vanity. Whatever the story, you've got options!
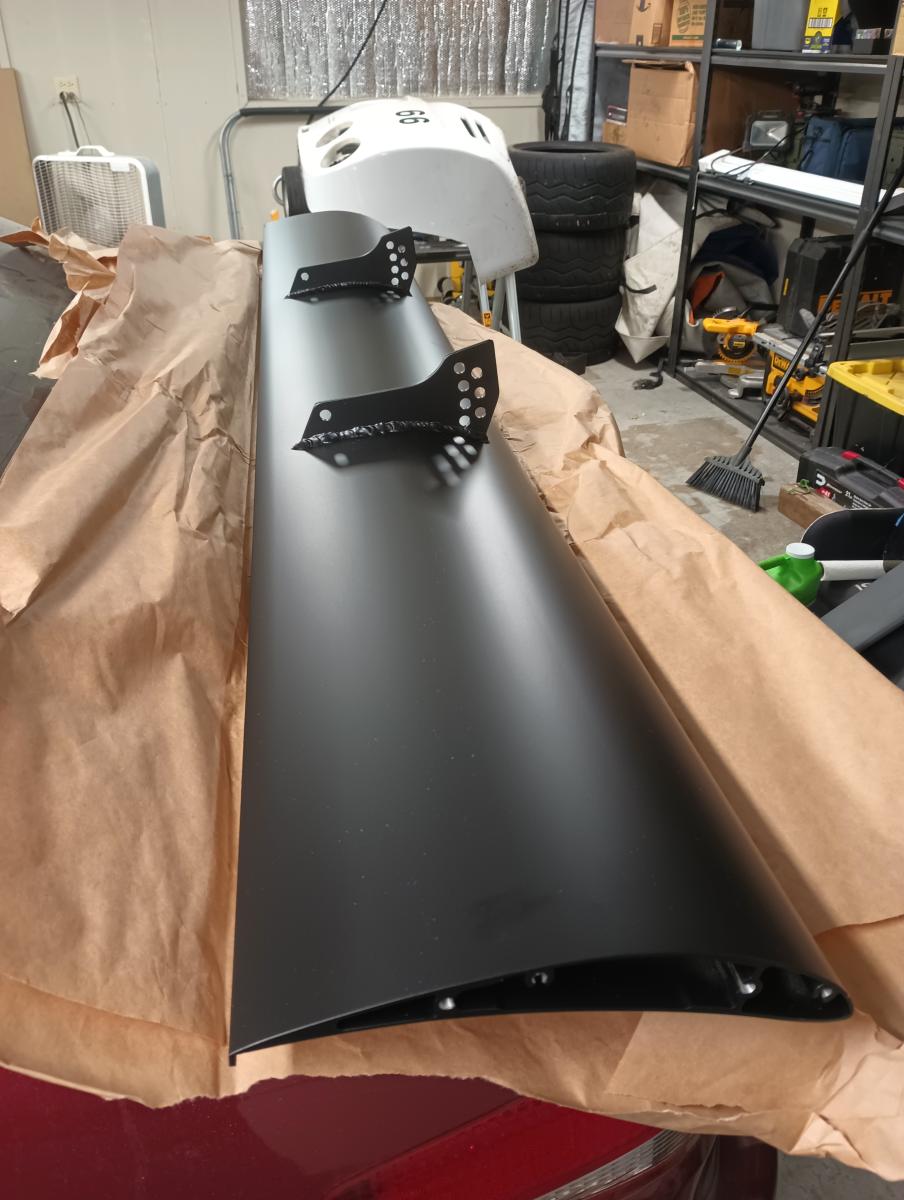
You'll need to source a wing, which is easier than you think and I have instructions for. Currently, I have design files for working with the WingLogic DIY 72" wing. The WingLogic wing has CFD data backing it up, done by Kyle Forster of JKF Aero and Youtube Aerodynamics fame. although some people have questioned the quality of that data. A few shops have noted that they installed these wings for customers with good success. Count me among the folks now who have used one of the WingLogic wing with success as well and are happy with it.
I was able to work with the rad folks at 9 Lives Racing to get an upright that matches their wing mounting, allowing you to run their far more tried and tested product. See my note below about doing an MDF prototype of the upright first, but otherwise it should do what you need! If you're reading this and also make wings and want something compatible with what you build, get at me. I'm all about making this work for as many people as possible.
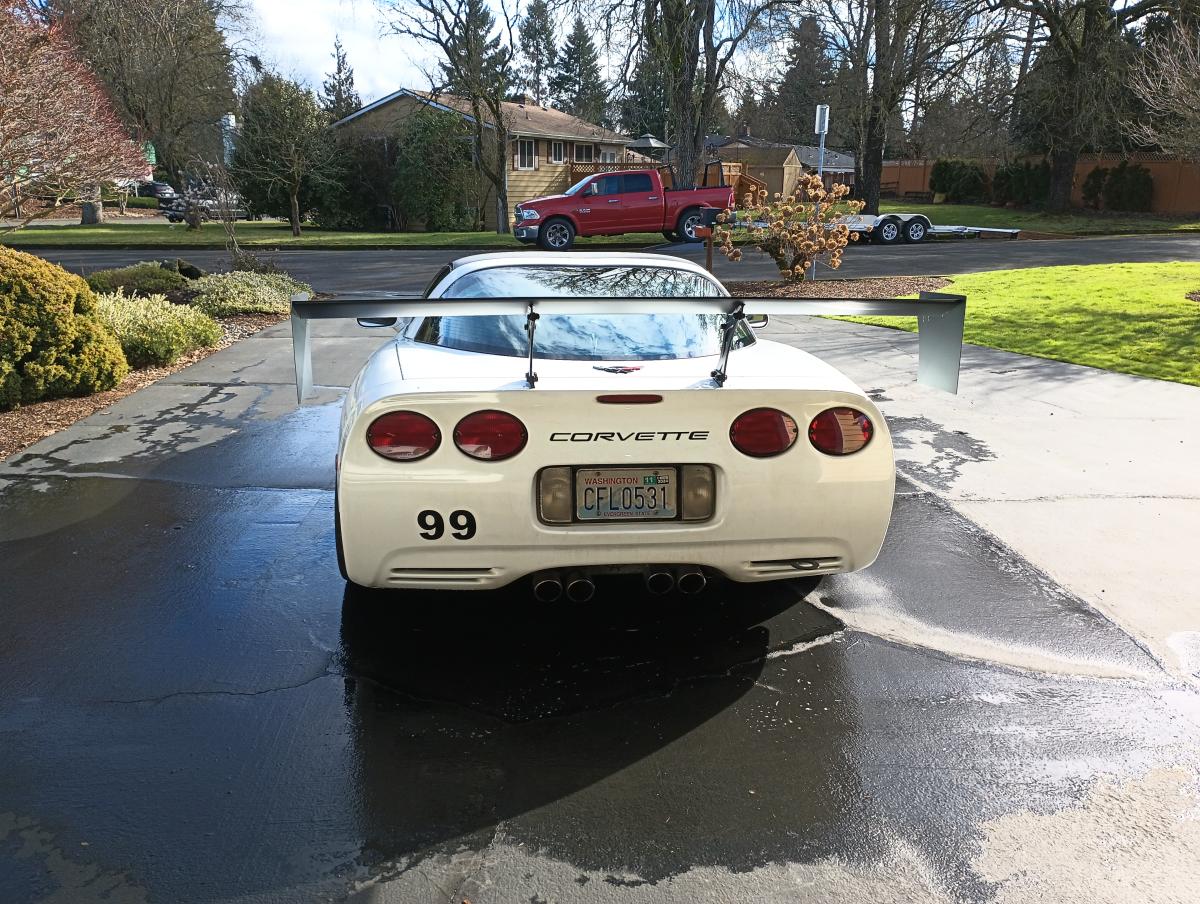
A DIY C5 Chassis Mounted Wing as layed out below, utilizing the WingLogic 72" wing should cost the average person about $946.57, and that's with big end plates and the entire thing being welded up by a fabriactor and powder coated. You can expect to pay as little as $674.83 if you weld aluminum yourself and don't care about powder coating. and save another $20 beyond that if you don't care about oversized adjustable endplates. If for some reason you are feeling really fancy, you CAN spend as much as $1520 to have it all welded up and utilize carbon fiber uprights and end plates. This is all still cheaper than the cheapest wing kit out there for the C5.
Added bonus of going with this wing kit, it meets nearly all of the class limitations on wings I've been presented thus far, which not all other wings can claim. It meets autocross CAM-S requirements of width (not wider than body, we beat that by a fraction of an inch) and also the requirement of no more than 6" off the rear bumper of the car (we beat that by a hair over an inch as well).
Parts List
- Wing
- Wing Logic 72" Wing **
- 9LR Custom Wing (71")
- Any other wing with 23" between the uprights
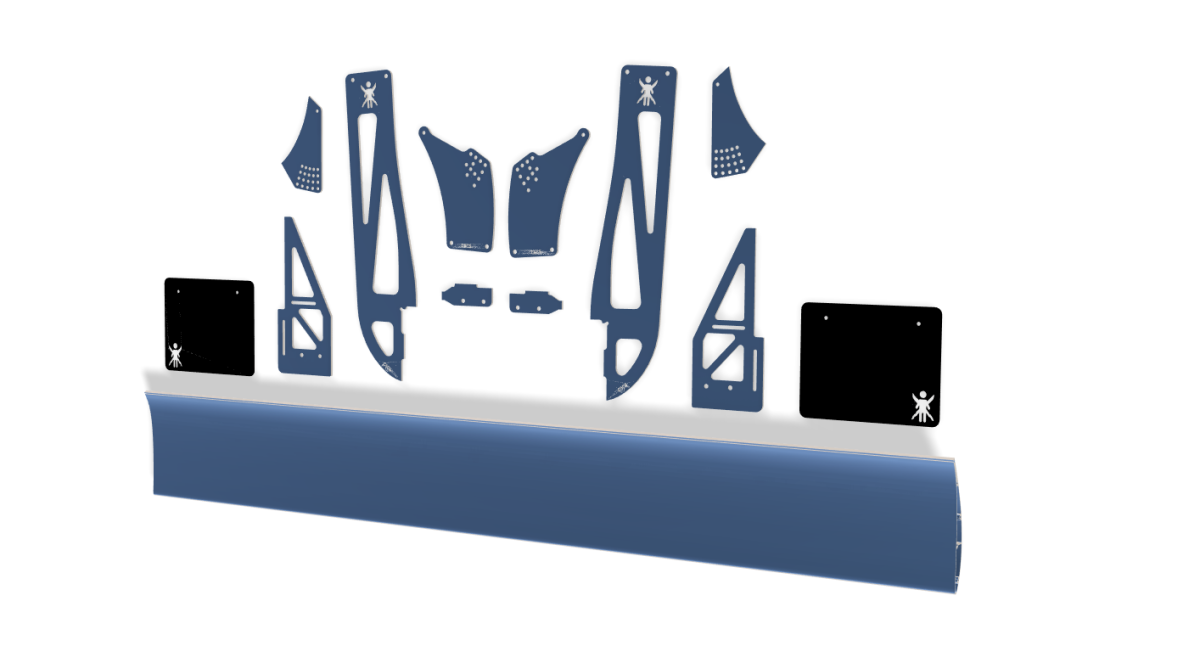
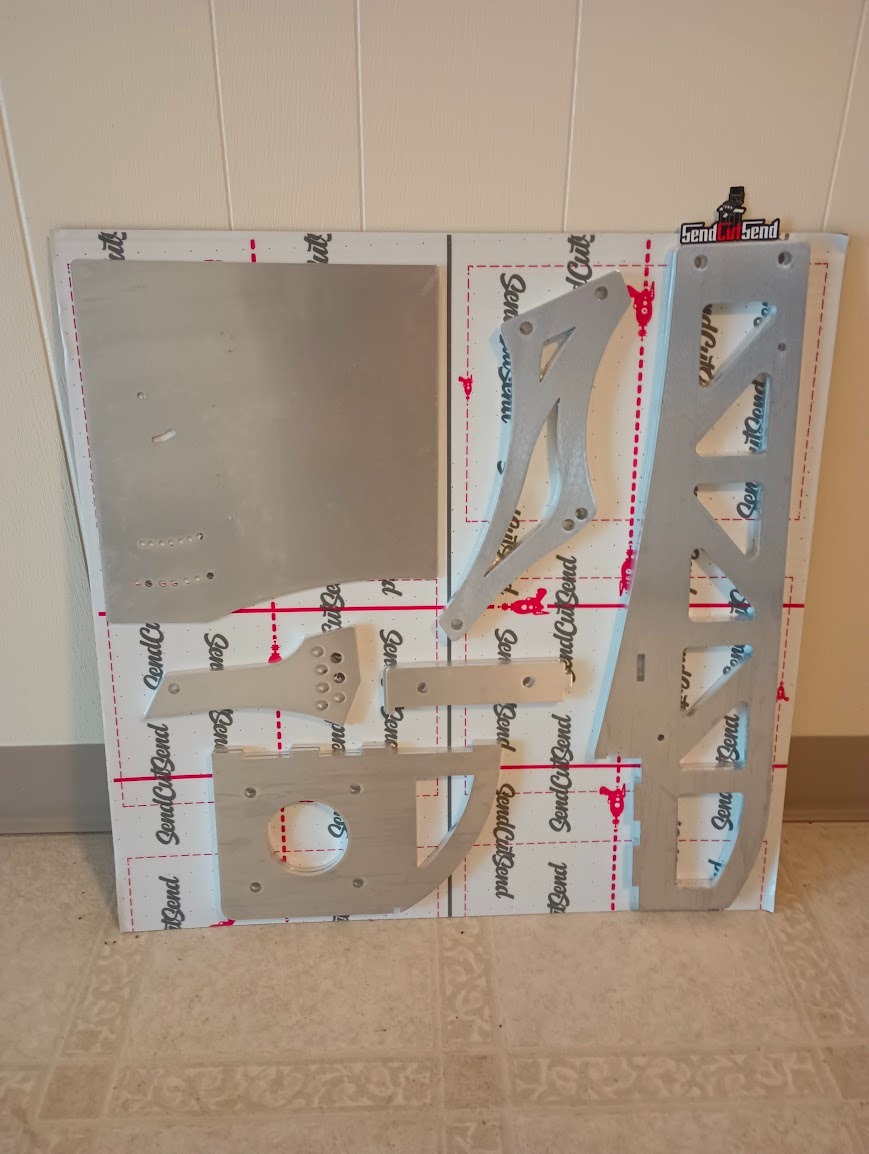
- All aluminum parts as needed (click link for SendCutSend cart)
- General Hardware for Chassis Mounts
- M10 X 25 Flanged Hex Head Bolts (2x, so you have 20 in total)
- 20 Pack M10 Nylon Lack Nuts
- M10 Washers
- M10 Fender Washers
- Wing Logic Specific Hardware
- All other wings, you'll likely need a few other minor bits and pieces.
** Please note when ordering the WingLogic wing that you can use discount code "jessebshredical" to save $20 and order the wing without their wing endplates and without their wing mounting plates. Instead you'll be using parts from the cart I have linked above from SendCutSend. ALSO Note that you can go with a 70" wing if you want to better adhere to SCCA CAMS class rules. 72" is ever so just barely inside of the fenders, and 71" from 9LR is probably best, but 70" isn't all that big a difference either and should pass scrutiny easier.
*** There are many folks promoting SendCutSend on youtube offering 30% discount codes to first time customers. Do a bit of research and you'll save a fortune. Or just put the items in your cart and leave their site. They'll shoot you a discount for 15% off just because if they have your email. Or just pay full price and support a rad business.
**** At this time the 9LR Uprights have not been tested. If you do go this route, that's rad! I would suggest getting the upright in MDF first to make sure with the wing attached the hood clears, as the 9LR upright appears to sit about 3/4" further forward than the WingLogic design, but their wing plate is also different so it may be fine. Still, it's $25-45 to find out with the MDF prototype. If it's not perfect just reach out and I'll adjust the design to ensure it clears the hatch/trunk.
Installing The DIY Chassis Mounted Wing
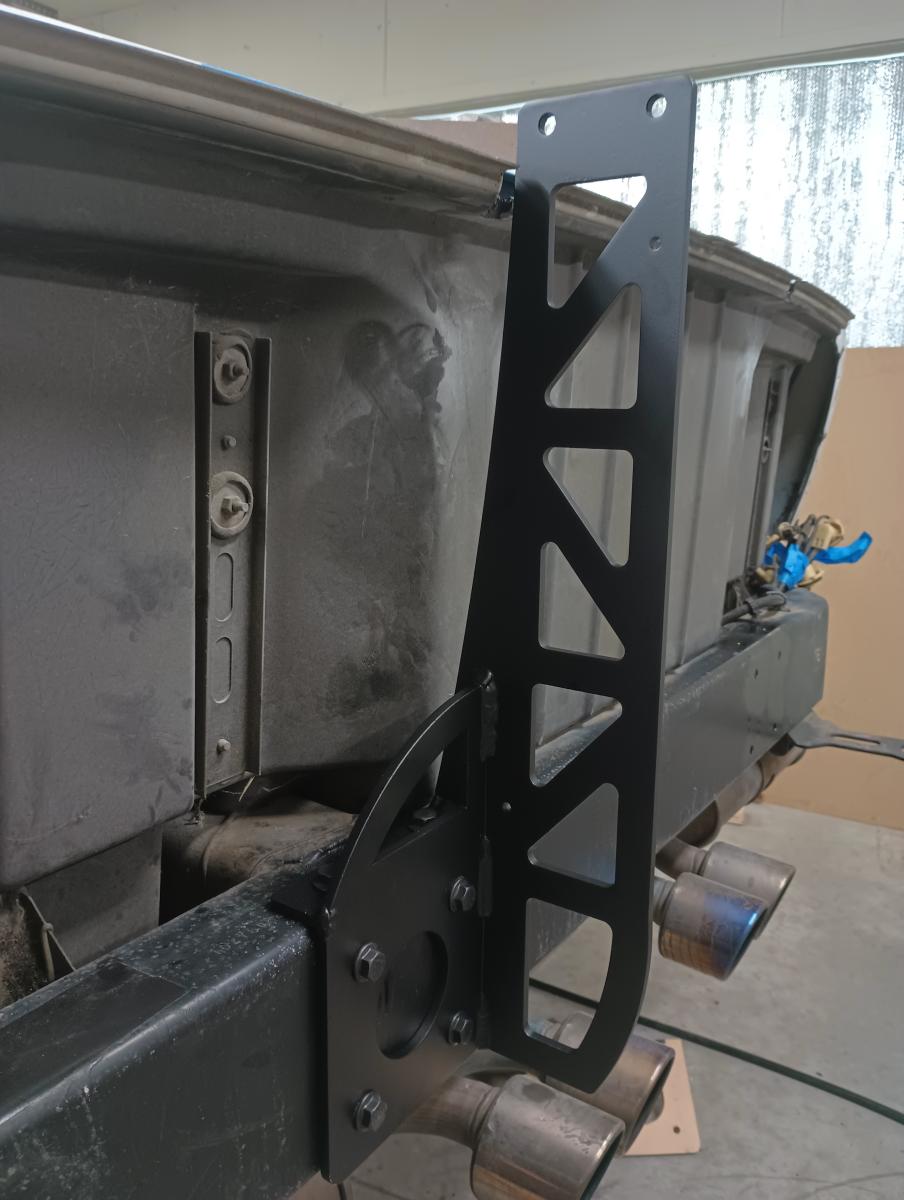
Step 1: Chassis Mount Uprights and Wing Mount Plates
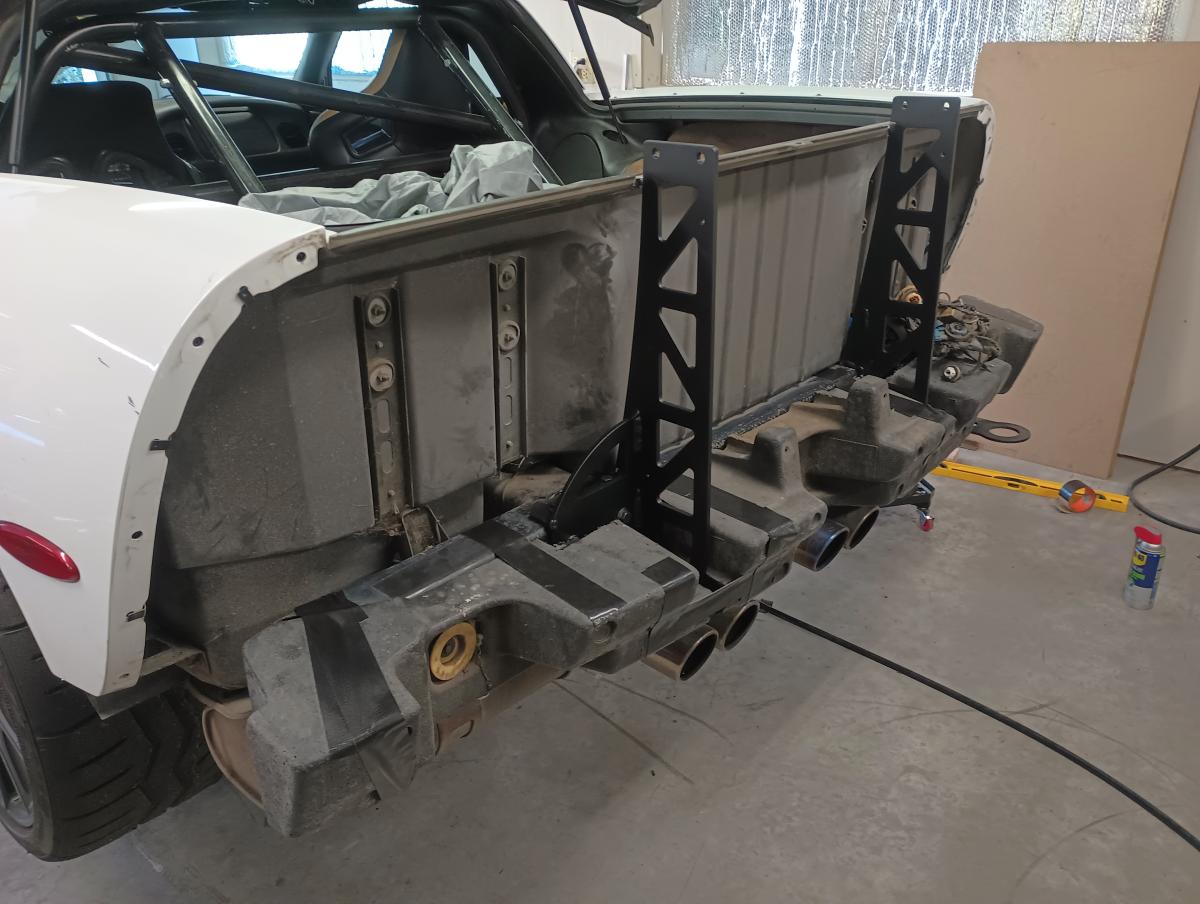
With all of the above parts secured you'll first want to get the chassis mount uprights welded together. If you're using the WingLogic wing, you'll also need the wing mount plates welded to the wing.
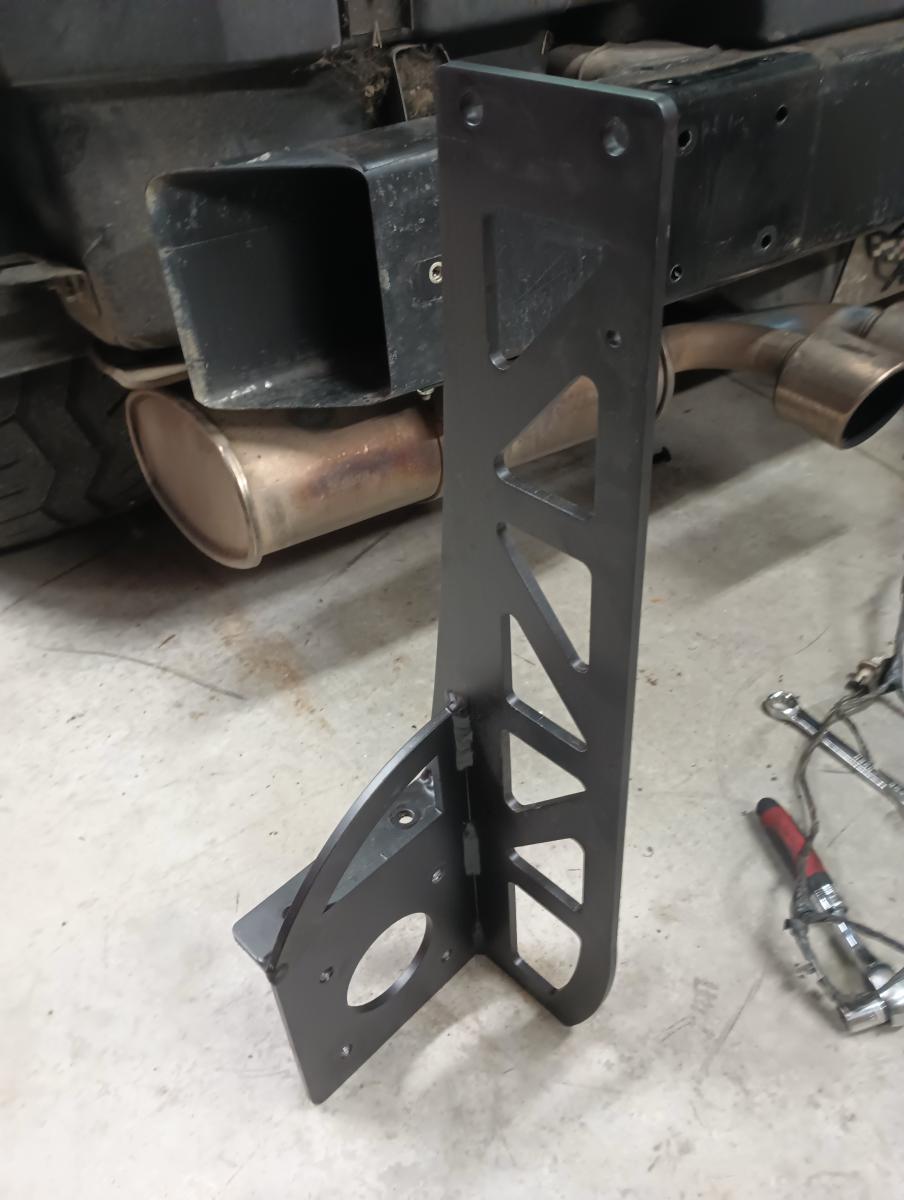
The chassis mount uprights are designed to interlock so as to help either you or your chosen fabricator to weld them up at perfect 90 degree angles. Do not weld where the chassis mounts need to sit flush with the rear crash bar of the Corvette. Some filing is likely required to ensure the fit is nice and snug. The fabricator I worked with used a press to get them together. Everything should sit at 90 degrees. If not, keep working at it.
The WingLogic wing plates should be mounted 23" apart (total) and centered on the wing. You will be putting your chassis mounts 22" apart on the crash bar, and the chassis mounts are .25" thick so that puts you at 22.5". Then you'll have the uprights on the outside of the chassis mounts, which are also .25" thick each. That puts you at 23". These widths are all important as they will clear the various parts of the bumper you don't wish to contact.
The wing plates for the WingLogic perfectly match the curvate of the WingLogic wing thanks to the folks over there sharing their DWG files, and should be fairly obvious where to put fore to aft on the wing. Other wings you order should either come pre-welded, or should contain the wing plate you need to weld up at 23" apart.
Fabrication and welding time from a professional should not exceed 2 hours when using the WingLogic parts. If so, you're being overcharged. The fabricator I worked with is world class and consequently took 1.5 hours.
Step 1 OPTIONAL: Powder coating.
With everything welded up but still mostly fresh from SendCutSend, now is the time to get things powder coated. Do it now, or grumble a lot later when you deal with dissasembling all of this again and cleaning it all up. Or just run raw aluminum and watch for the glaring reflection of the sun. Whatever is clever. Powder coating for everything including the wing ran me $200 (in early 2024) but I was able to piggyback a cash account for that price. Your costs will vary, research who is available locally, etc etc.
Step 2: Remove the Rear Bumper
There are several good videos on the topic. The above one is one that I watched, and there were several other I referred to as well. Having now removed the bumper 5-6 times as part of this process I can tell you that the process isn't that difficult, but at times will be challenging and involve some flexibility and a variety of tools to help make life easy. It's all discussed in the video, so I'm not going to go into great depth. Also remove the foam behind the bumper, which is easily done with a 10mm socket.
If you're working with an outside fabricator, this step can be done while they're assembling and welding up the chassis mounts.
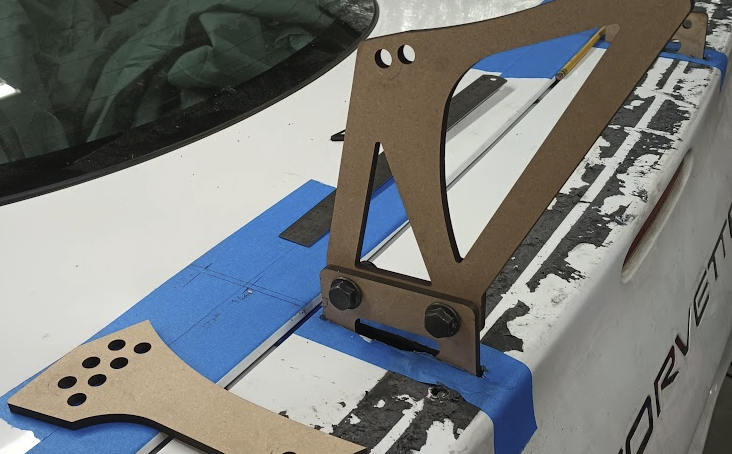
Step 3: Mark out 22" from center on the rear bumper
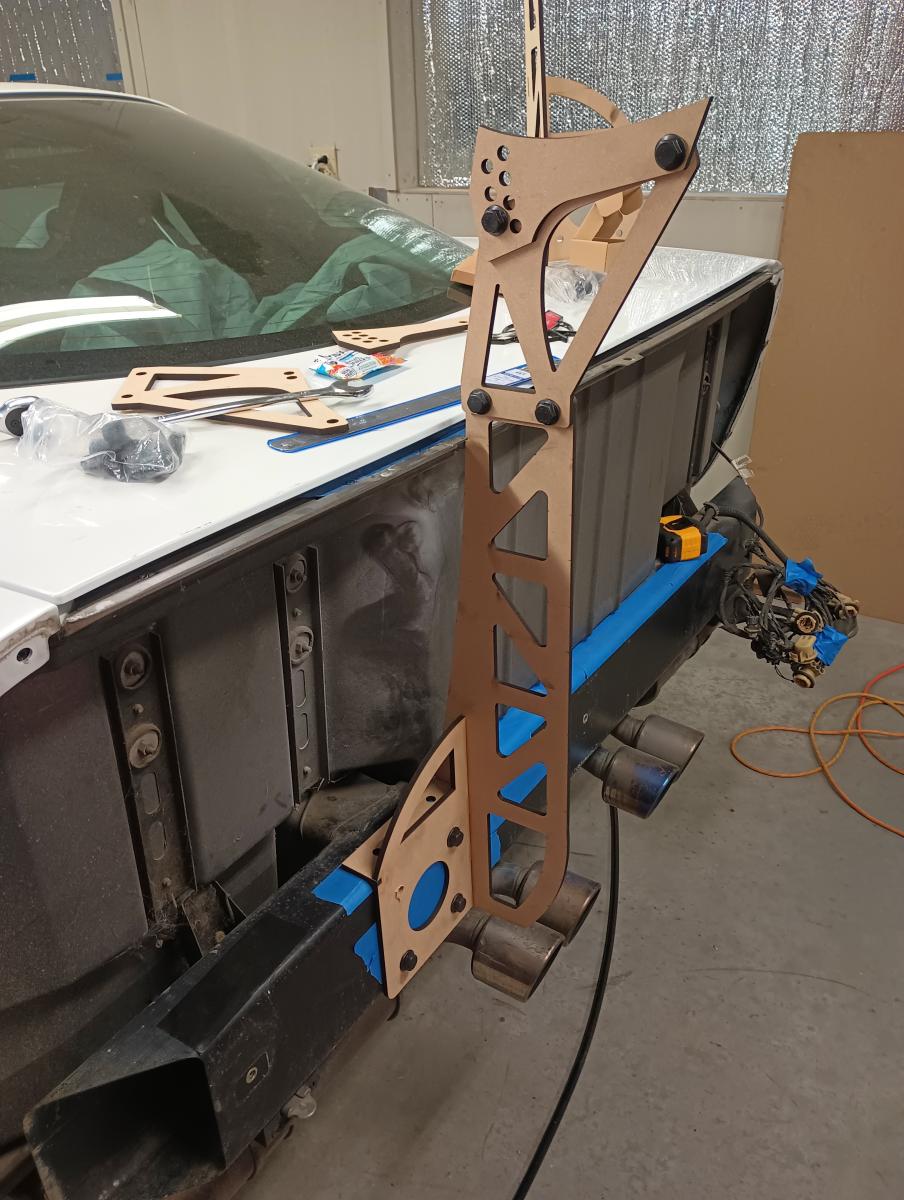
As you can hopefully see in the image above from when I was test fitting all of this with MDF prototypes, I placed blue painters tape on the rear crash bar. I measured to center of the crash bar, which incidentally lined up with the factory centered rivnut. I then measured 11" to either side to get a total of 22" wide. I marked the crash bar with these locations so as I knew where to line up the inside of the chassis mount uprights.
I do reccomend notating the position of your brake lights as you remove them. I labeled them RR, RM, LM, and LL so as I could easily reinstall them. I also have the "flush mount" delrin bits that let these all line up flush with the bumper for me, so keeping those delrin bits attached as well is really helpful.
Step 4, line up uprights and notch the Factory "tub"
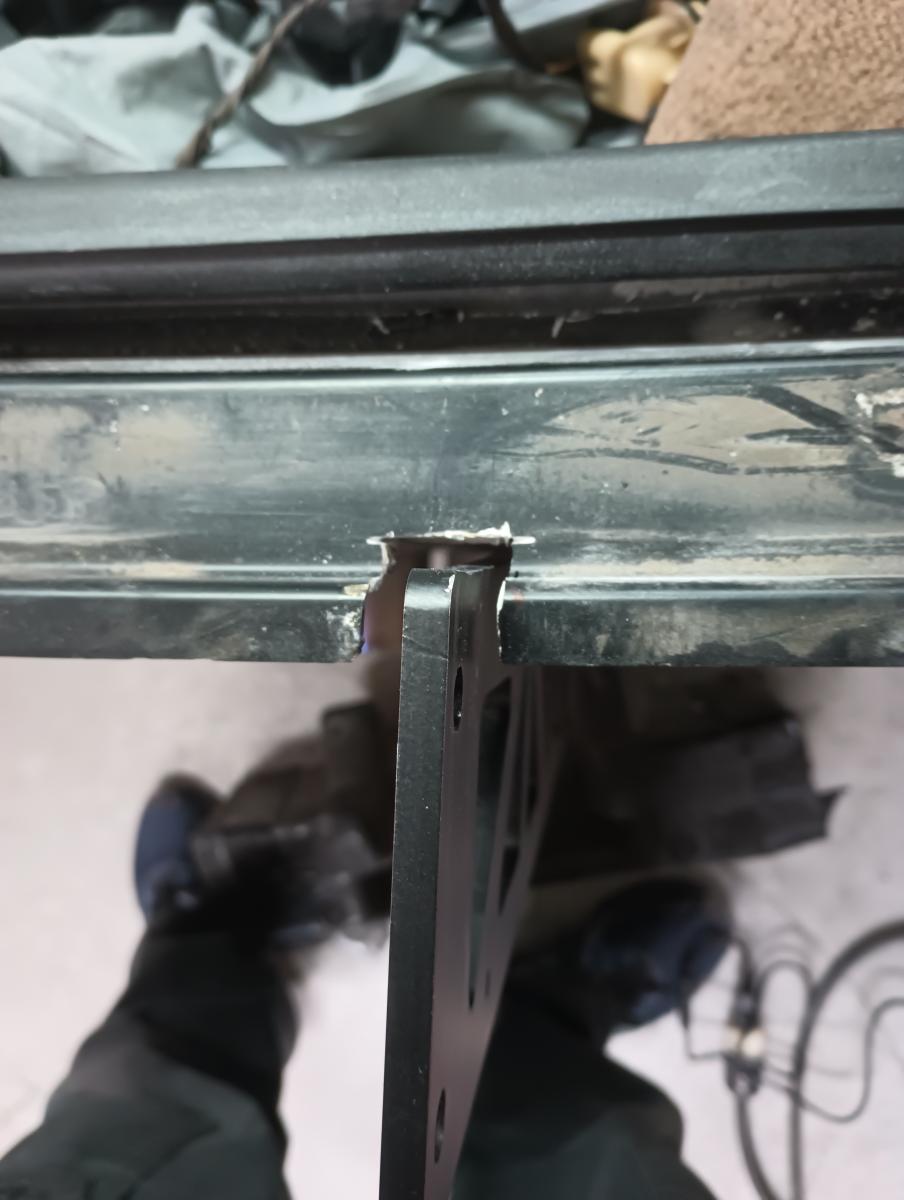
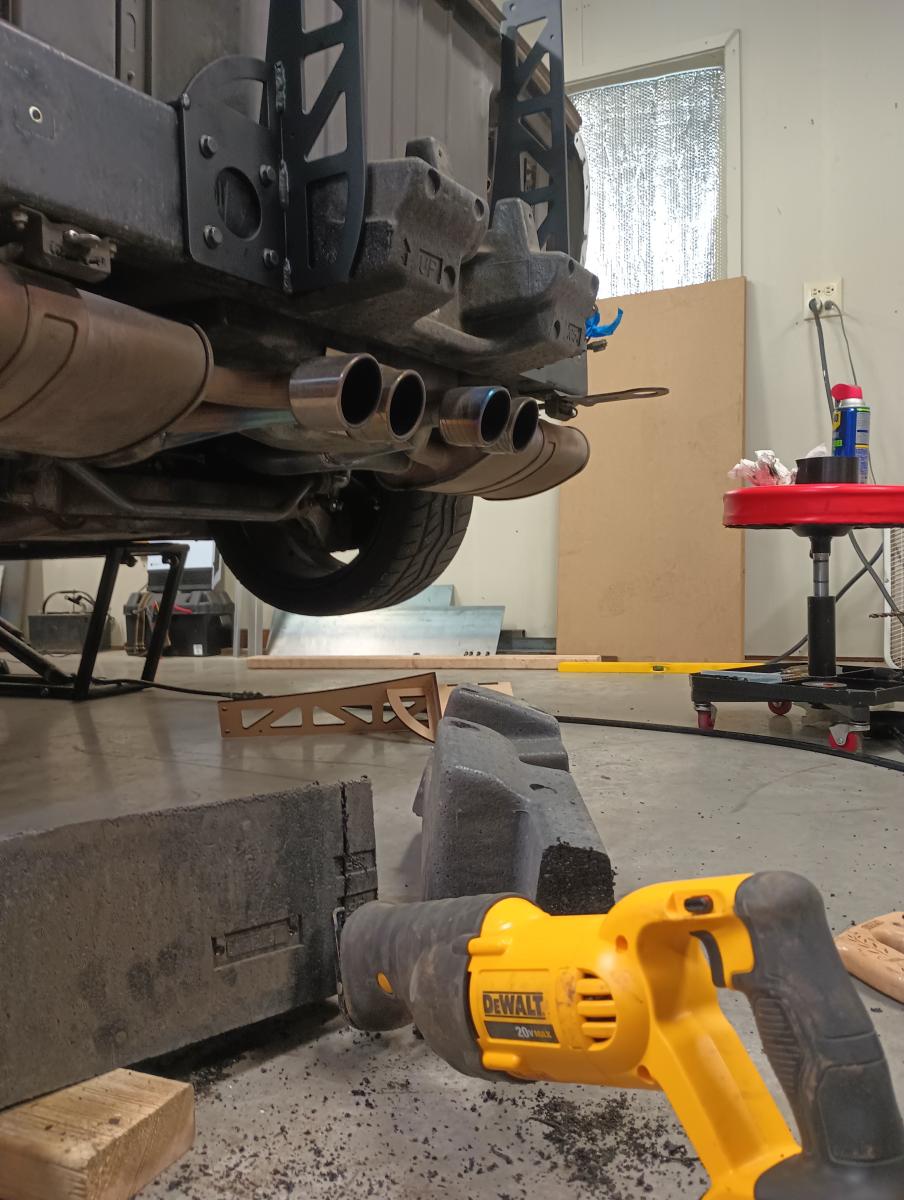
Beneath the bumper is a bit of a notched area that the bumper is bolted to that I'd like to refer to as "the tub". You'll want to line up your chassis mount on the crash bar as best as you can and then upwards to this "tub" portion. The upright will not sit flush on the crash bar as the tub interferes with the upright. You'll need to notch out the tub with whatever tool you have capable of doing the job (I used a dremel). Proceed until the chassis mount can sit flush on the frame and there is a small amount of room in front of and to each side of the chassis mount in the area you just notched out. The wing may wiggle a bit and there's no sense transfering that stress to the tub or bodywork.
Step 6, Drill the mounting Holes for the Chassis Mounts, attach via two bolts.
At this point you'll want to mark out the holes for your chassis mount and drill them. Line the chassis mounts so as their interior edge is right on the 22" mark and then mark out all 6 holes. Remove your chassis mount, and drill out the holes. I recommend hitting the holes with a bit of spray paint to help prevent future corrosion issues. Attach the chassis mount to the bumper with two bolts, ideally the top right and bottom left of the 4 hole section of the chassis mount. You can do more if you want to be absolutely certain everything is lined up, but two should more than do the trick.
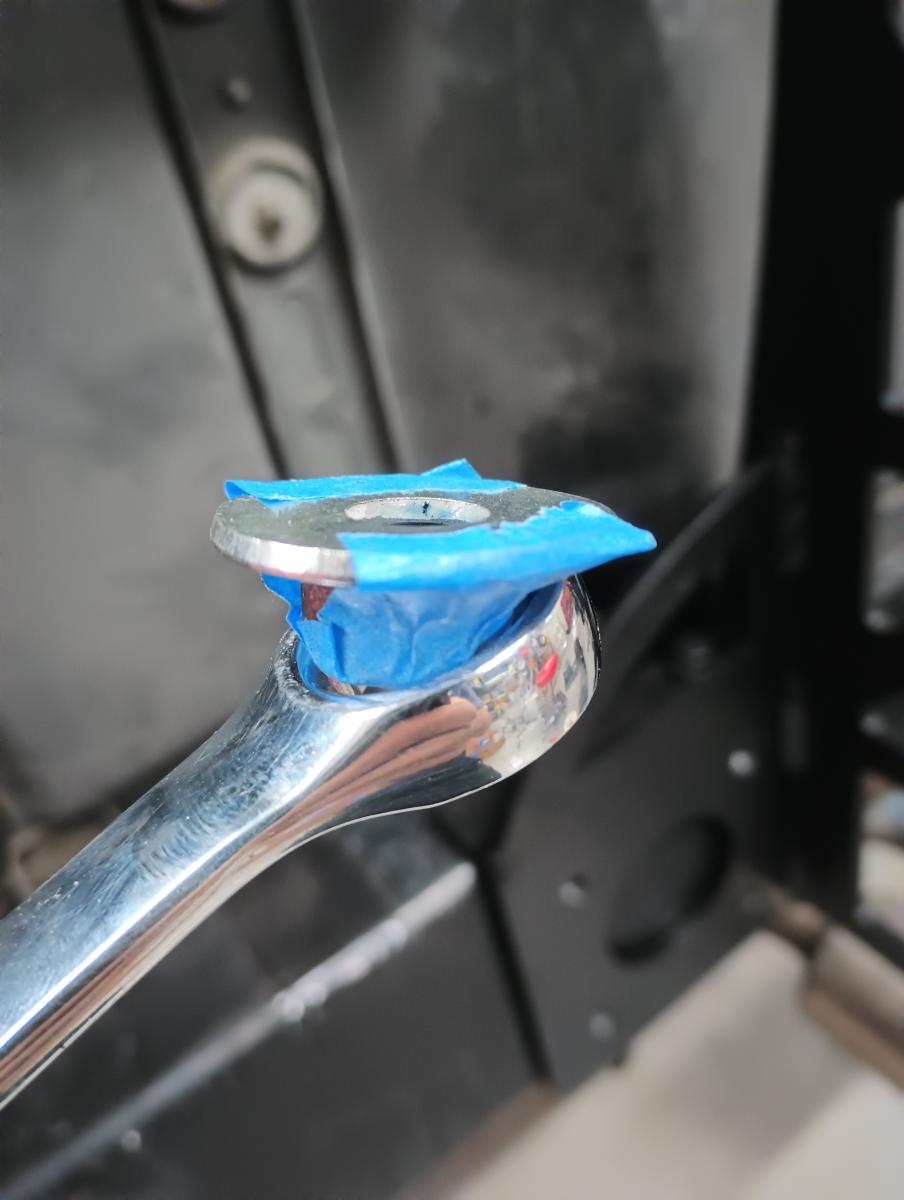
Geting the nuts in to the bumper can be difficult, especially with how narrow the crash bar is. A trick I found worked well was to painters tape the nut fender washers, and then push that into your wrench. This holds it in place. Then look through the hole as you slide the nut into place with the wrench. Slowly thread the nut into the bolt and then you should be able to do the rest easily. Also, it should go without saying you do inside bolts before outside bolts.
Step 7 Notate the location of the Chassis Mounts using a straight edge on the cars trunk/hatch
Unforutnately I don't have a better picture of this at this time, so this will have to do. With the bumper OFF (different front picture) and your hatch/trunk closed, place blue painters tape on the trunk/hatch of the car. Now, take a straight edge and place it on the side of the upright. Trace from the upright forward onto the painters tape on the trunk/hatch. Do this for both sides, and you should have two lines now on your trunk running parallel to your chassis mount and at the same width as the chassis mount. Lastly and very importantly, you'll want to mark a spot on your painters tape along the line, and measure from that spot to the front and back of the chassis mount. Notate those distances right there on the painters tape. With these lines traced and the measurements taken, you will be able to exactly cut out your bumper to fit.
Step 8 Mark and Cut the rear bumper.
(Distinct picture(s) hopefully to come soon)
Remove the Chassis Mounts, place the bumper back on but only secure it with the small torx head screws. Now, apply painters tape to your bumper in approximately the area you'll be cutting the bumper to allow the chassis mount to come up and through it. Take your straight edge, and extend your parallel lines from the trunk/hatch onto the bumper painters tape. Lastly, copy the fore and aft positions of the chassis mount. Presto, you've got the exact square you need to cut out of the bumper. I recommend cutting out the opening with approximately 2mm of additional clearance on all sides. The chassis mount will flex a little, and you don't want that force translated to the body of the Corvette. Also, if one side is snug and the other has some wiggle room, when doing a "grab and shake" test of your bumper it may give you the false sensation that one side is coming loose while the other is snug, when in reality they are both snug one side is just contacting the bodywork removing any wiggling
Step 9 Fully Mount the Chassis Mounts now. Modify foam to fit around the chassis Mounts
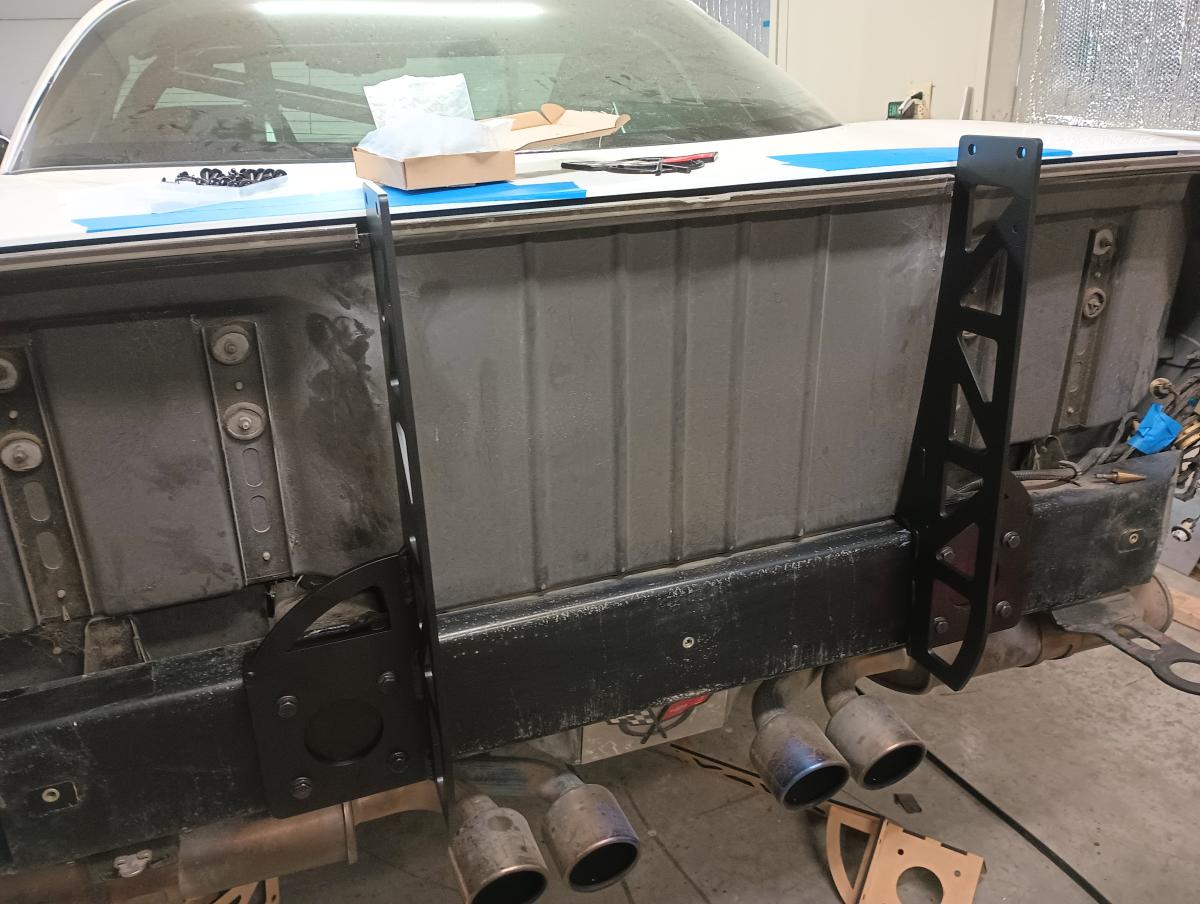
At this point, you can safely mount the chassis mounts on for the last time. Getting to the inside most bolts can be a bit of a chore, but do consider the painters tape method I provided above to help make things easier. You're going to want to utilize the fender washers behind the 4 bolts on the front plate of the chassis mount, but not for the two bolt on the top plate, they are too close to the edge of the bumper unfortunately. I personally used blue loctite, which in combination with the nylon lock washer was overkill. I don't have a torque value to recommend for these, but I will say I was able to tighten all of these to my maximum physical ability with a decent length wrench and ratchet... so just be smart about torquing these and they should be able to handle far more torque than they'll ever need. M10 bolts are pretty significant, so if you do managed to snap or strip the threads on these... you're an animal!
With the chassis mounts secure, I do recommend a quick test fit of the bumper. Everything should slide on and there should be plenty of clearance to make it happen.
Next up, you'll want to modify the bumper foam to fit around the chassis mounts. I just used a sawzall to cut out where I needed to, and then secured all of the three chunks that left me with with the standard bolts. I then utilized a signficant amount of gorilla tape to ensure it was all quite secure. I really don't want to come back here and have to redo this.
Lastly, you'll want to run all of your wiring back through the chassis mounts and put it all approximatley where it belongs. This is also a great opportunity to rewrap all of your wires if the electrical tape on yours is as decayed as mine was. Throw on some music, burn 40 minutes or so just wrapping it all back up and it should be good for another 20~ years.
Step 10 Reinstall the bumper
Nothing special here. Just reverse the steps to install the bumper. My only reccomendation is take your time here, make sure everything threads in properly, etc etc. It might take some faffing, and it's not impossible that you may run into issues nescessitating backing up to the start of reinstalling the bumper. It's worth taking your time on this though and NOT defaulting to the mindset that this is the last time you'll be in here. It's not impossible you did some small step above wrong and will want to revisit this area in the future so take your time and do it right!
Step 11 Secure the wing uprights
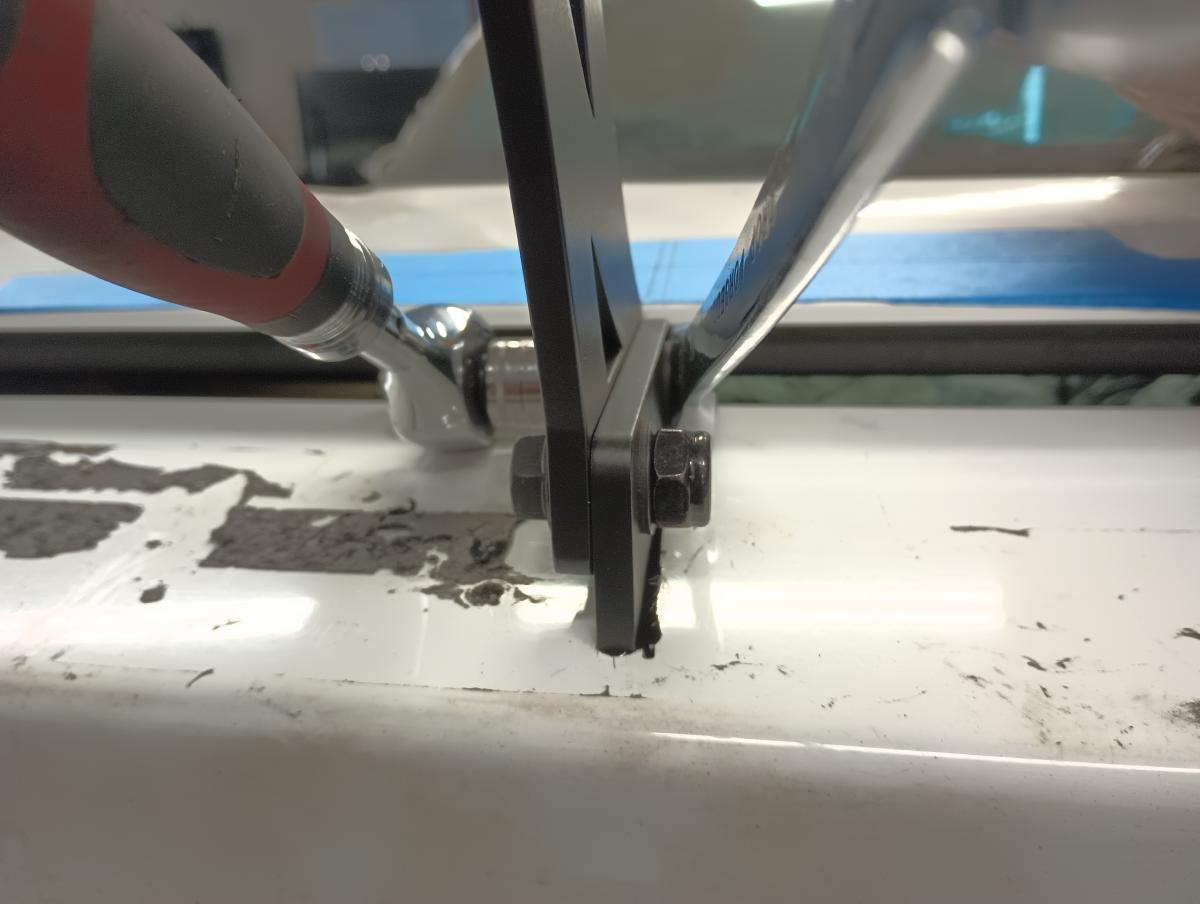
At this point you're in the home stretch. Secure the Uprights to the chassis mounts. You'll place the uprights on the OUTSIDE of your chassis mounts, and should have a final width of approximately 23" from outside to outside of the wing mounts. There's a small amount of flex in this setup, so if you're off a hair, that's okay. It'll work still. Be sure to use the washers here behind the nut. It will appear as if there isn't much thread, but there's just enough to engage the nylon and ensure it stays on. Apply blue loctite if you're really worried about it, or purple loctite (low strength) which everyone seems to forget is an option.
Step 12 Attach the wing & Endplates
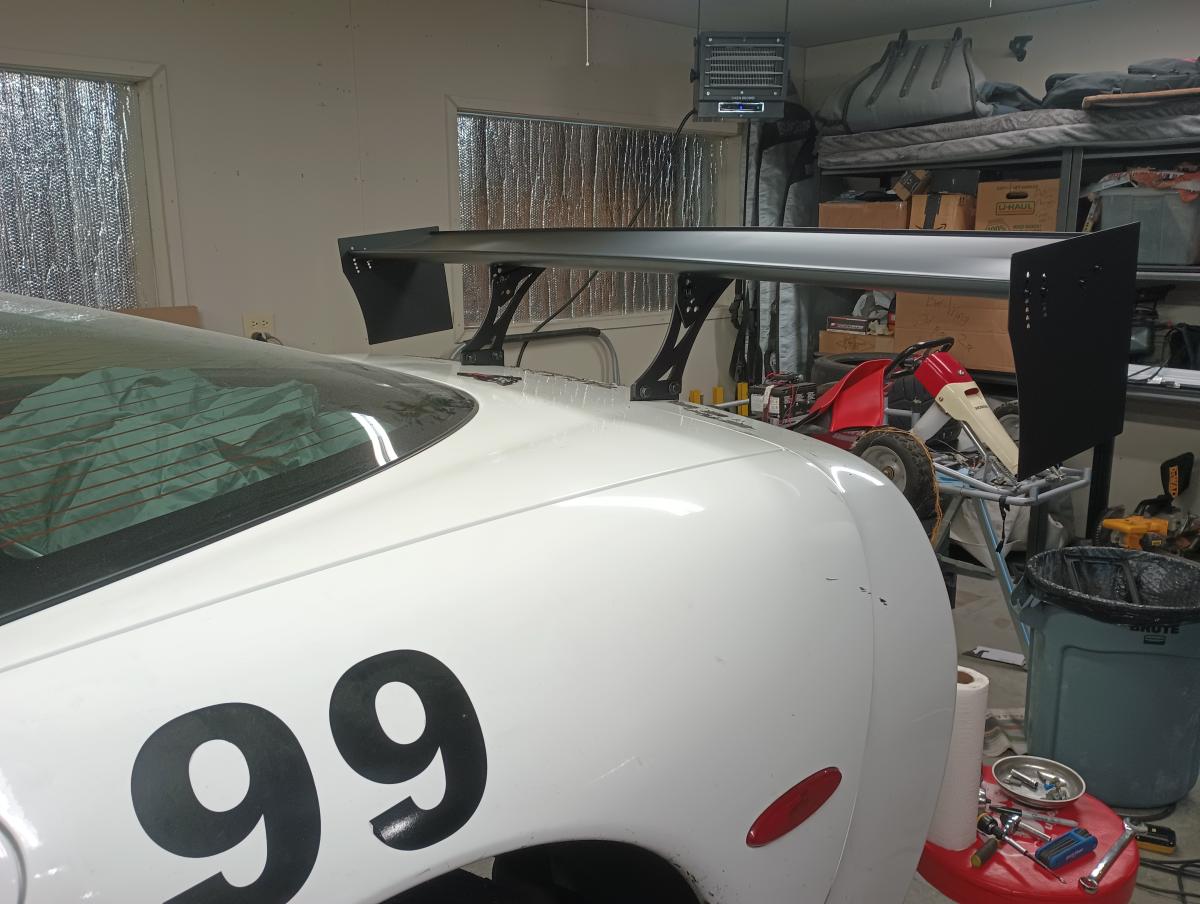
At this point, you'll just need to attach the wing and the wing endplates. If you're using the WingLogic wing and plates, you'll mount the wing plates with M10 bolts and nuts all the same as the uprights, but will have a bit more thread sticking out past the nylon nut than you did on the uprights as the size of the WingLogic mount plates is slightly thinner.
It is worth noting that if you're utilizing the WingLogic wing and endplates, you'll need to adjust the angle. I intentionally setup the wing mounts to adjust at about 3.5 degrees or so per hole, and the wing plate itself is also adjustable to maintain a largerly parallel to the group orientation. Please note when reviewing these that the rake of your car will also impact the angle of the wing, so you may find different values when utilizing an inclinometer. I personally started on hole #4, and that worked quite well for me out at the track.
Here are the wing angles (From top):
| Hole | Side | Appx Angle |
| 1 | Right | +3.27 ** |
| 2 | Left | -0.264 |
| 3 | Right | -4.22 |
| 4 | Left | -7.77 |
| 5 | Right | -11.67 |
| 6 | Left | -15.28 |
| 7 | Right | -19.12 |
** Why a positive angle as the starting position? Welp, some nerd was surely going to call out that the air coming over these cars is not likely actually level and may have a slightly downward angle. Consequently running approximately 3 degrees positive should yield an "actually" 0 degree angle of attack of the wing relative to the air over the car. Do what you will with that, I haven't tried it and doubt I will.
Now, go enjoy your wing!
At this point everything should be installed and all back together. Go take a test drive and make sure everything is happy for you at reasonable speeds, then go find a controlled environment to test that the wing continues to hold without issue as you increase speeds. I have personally tested this wing the better part of 100 times above 120mph without issue, and while I can't guarantee or promise any results, I am personally confident utilizing this wing for myself at such speeds.
Please do capture some pictures of both installing this wing and on your car! I'd love to feature it in this article!
LASTLY: If you do install all of this and are happy with it, please do consider sending me a few bucks for pizza or something like that. I have a good job and don't need this income, but a thank you is not something I would turn down!