C5 Corvette - DIY Oil Cooler
When it comes to things you worry about on a car you pwm... blowing up a significant part of the drivetrain is a serious concern for most. The engine blowing up is definitely one of the biggest concerns in that regard and while the C5 is pretty robust, anything you can do to keep it alive and cool is time well spent!
Bearing that in mind, while some folk build their cars for maximum power, I chose to first and foremost focus on reliability and handling. One of the main areas you can take a C5 corvette and increase reliaibility is through ensuring the oiling is good. There's two ways to really handle that: Keep the oil at a reasonable operating temperature, keep the oil flowing at a good pressure!
I started first by installing an oil cooler to help combat oil temperatures, but of course I ran into the problem that there wasn't much documentation on how to do a DIY solution to this. There were products of course, but they all seemed expensive for what they were, and I like to do my own stunts anyways. So if you're looking to also do this yourself, I've paved the way for you, I got a parts list, and here's what you need to know!
Oil Cooler Parts & Special Tools List:
- Block adapter (I used this one, Improved Racing also offers one)
- Oil Temperature Sensor, 1/8 NPT (Specific C5 one, check the link)
- Oil Cooler
- 19 row, 10an fittings
- All you will ever need for vehicles without a splitter.
- Great way to keep boosted street cars cool.
- Great way to help keep the car cool in warmer climates such as Arizona.
- 25 row, 10 an fitttings
- Overkill for street use.
- Overkill for stock engine track cars without a splitter.
- Currently endorse for modified engine track cars or any C5 running a splitter.
- 19 row, 10an fittings
- Hose components
- 20' of 10an braided hose
- 4x 10an hose ends (hose to female) (I recommend ordering an extra 1-2 if you're new to AN fittings, just incase)
- 10an Hose End Install Tool (Kool Tool) (Optional, but highly recommended for ease of install)
- 10an check valve (optional to prevent drainback or for adding an accusump later)
- AN Wrench (Optional, but keeps from marring your AN fittings.
- Thread Sealant (Optional, but both seals threads and acts as mild loctite, even on AN it's cheap peace of mind)
- Grill Mesh (Or whatever you want between the bumper plate opening and your Oil cooler)
- Door Trim (for perimeter of grill mesh to make it look nice and not scratch anything up in the vicinity)
Some notes on parts I went with:
The block adapter I went with does not feature a thermostat. Some people say having a thermostat is ideal to keep your engine from running too cool, or to keep it from taking too long to heat up.
I highly recommend street and/or street/strip cars in all but the warmest of climates go with a thermostat driven block adapter. In 70 degree weather with my street driven Corvette I simply couldn't get the car warm enough to even get on the thermostat. After a full overhaul of my car for more power I could sure... but a stock to mild LS seeing street use, I'd get a thermostat driven unit.
In my current use case of being a track only car... I don't really deal with cool temperatures for very long, and I can be patient with my startups on the Corvette. The thermostat is also one more thing that can fail. Reliability being the goal on the track, I just went with the straight through block adapter.
Installation Of DIY Oil Cooler
NOTE: Be sure to read end of article, where there are some examples of other peoples improvements, along with an improved 25 row oil cooler bracket installation you can see!
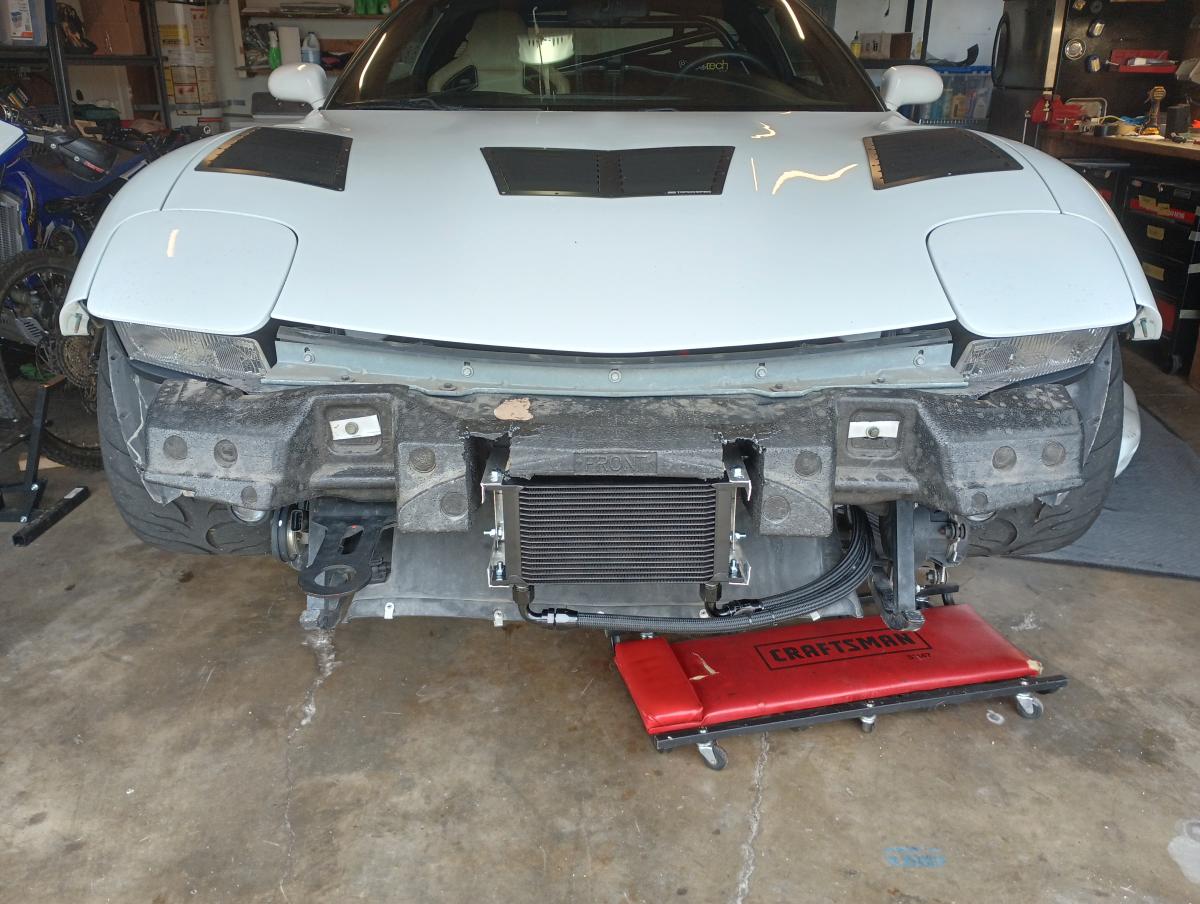
Remove your front bumper:
First thing you'll need to do is remove the front bumper. It's going to seem intimidating at first, but I assure you it's really not that big of a deal! I used the above video to get me there. You can skip the first minute or so about jacking up the car, unless you don't actually know how. I can't imagine you'd want to tackle something like this though and not know how to get your car up on jackstands.
With the bumper removed, next up is getting the oil cooler placed somewhere reasonable. Given my welding equipment was not in the garage I had at the time,I went with the simple solution of angle aluminum bolted together to make it all work. I then used rivnuts in the front crash bar to hold the bracket, and it all went together fairly smoothly.
"Pro" Tip: Make the bracket first, and tape it to the crash bar. Then, put the bumper back on but don't tighten the bolts. Confirm alignment of oil cooler to the opening. Remove bumper and adjust if nescessary. Once it's all in place, THEN drill your holes.
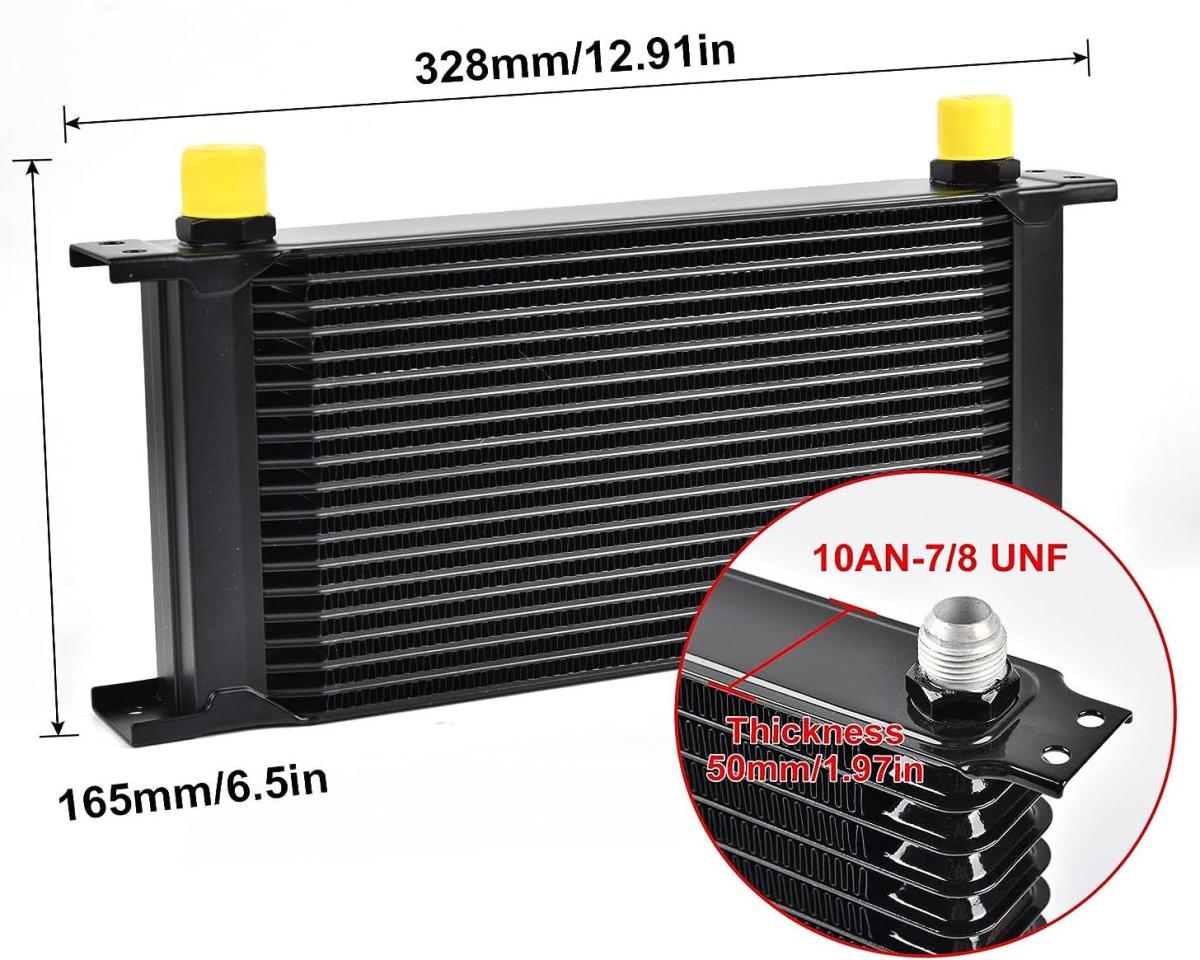
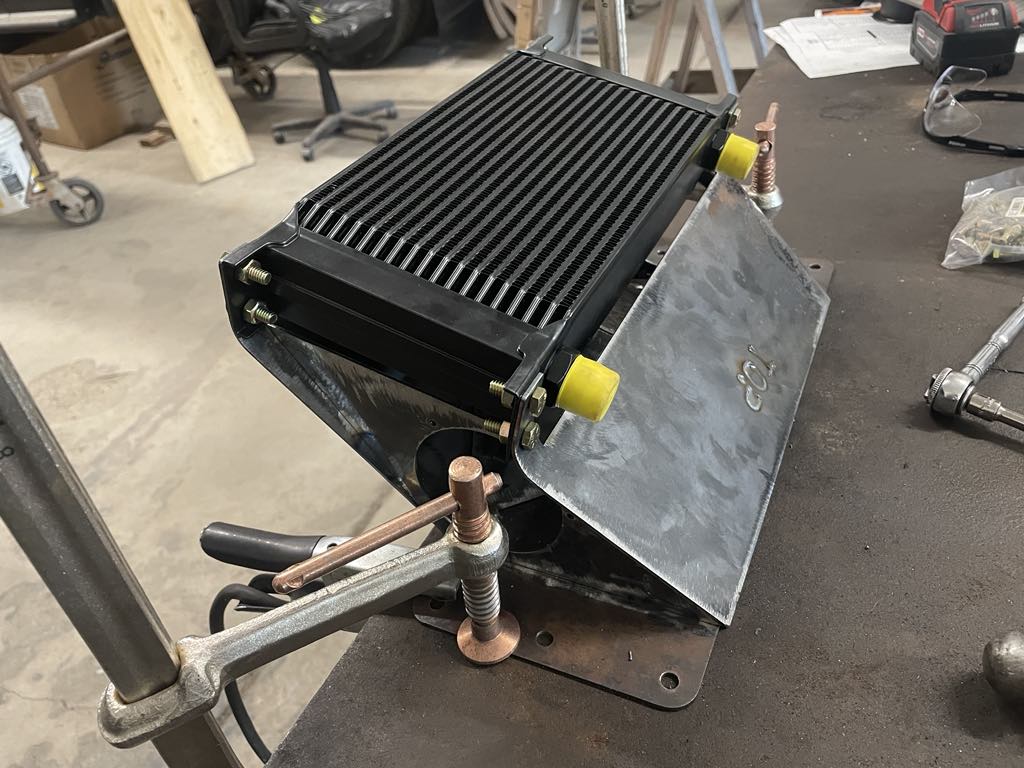
Some folks looking to mimic what I've done here have been asking for dimensions of my oil cooler, so the image above should capture it. External dimensions including the AN fittings is 12.91" wide, 6.5" tall, 1.97" thick. It is a 19 row oil cooler. I would later upgrade to a 25 row oil cooler, and I'll share that info later in the article. Most folks are fine with a 19 row... but 25 row is great overkill!
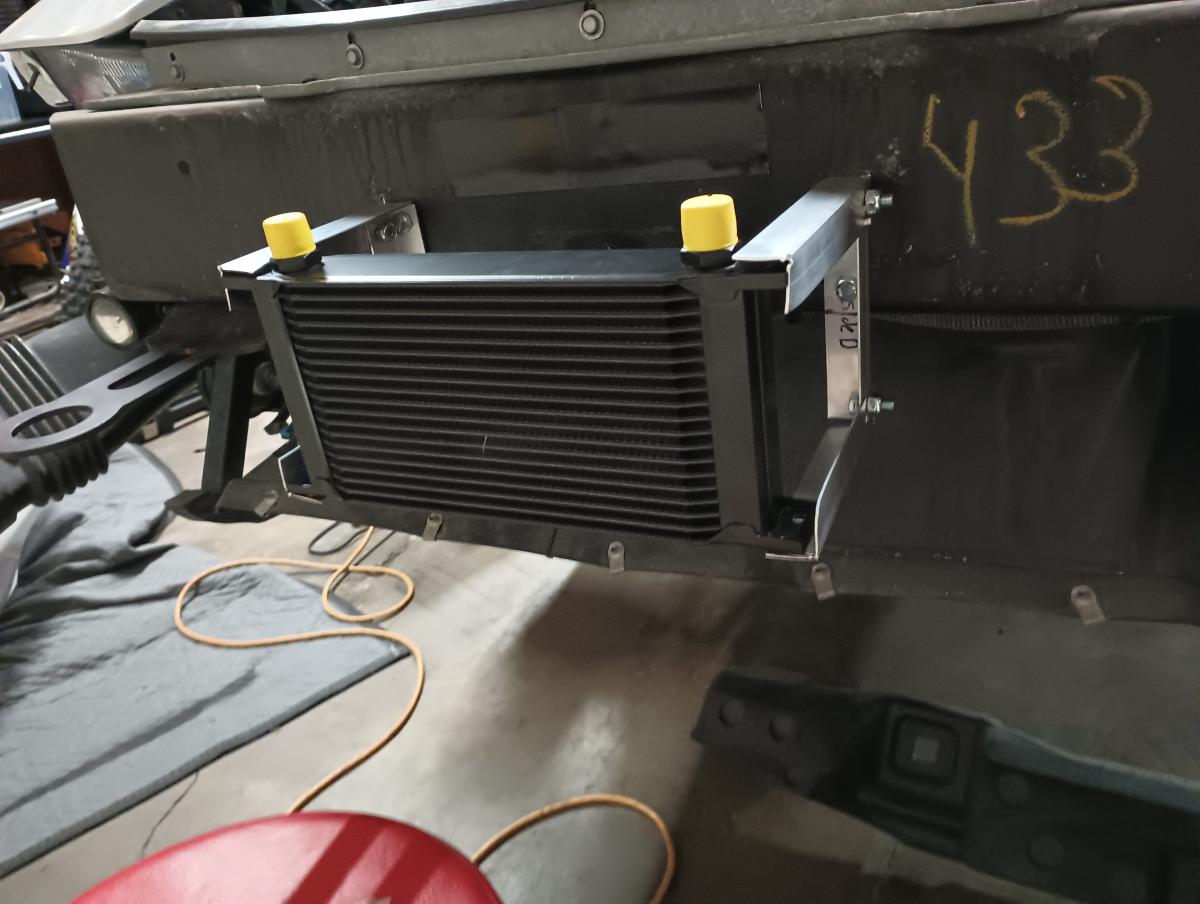
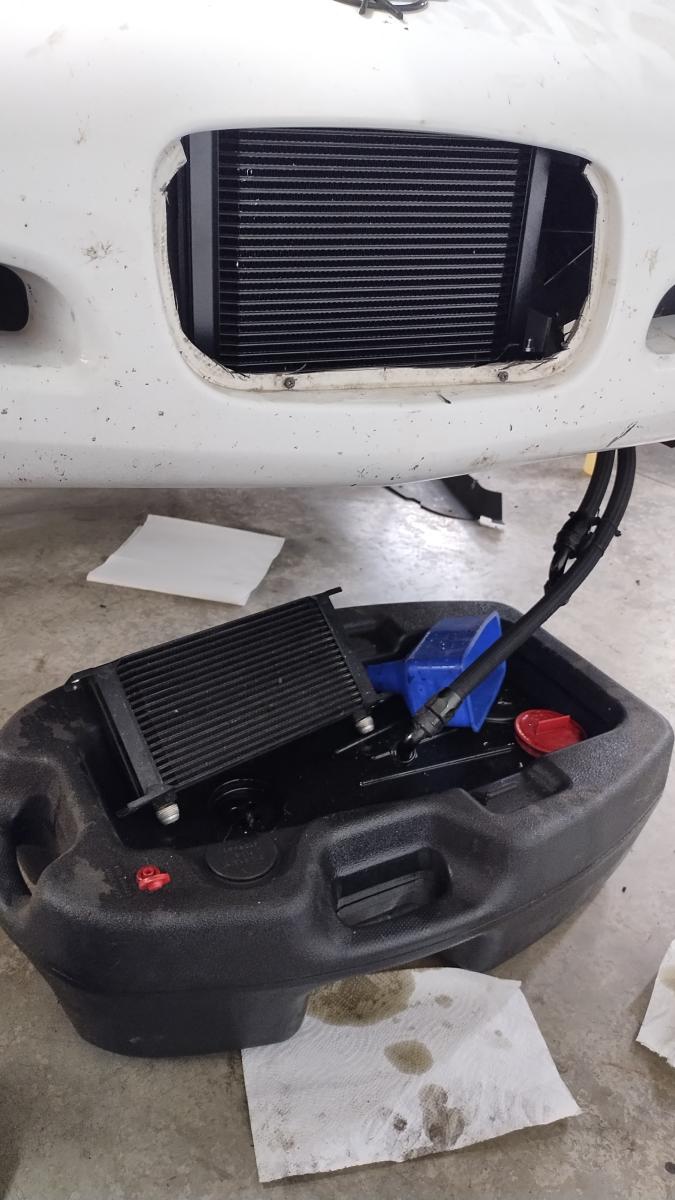
One thing I wanted to do different with my oil cooler install, was figure out how to install it "right side up". This will put the AN connectors on the top, so as when oil enters the coolers, and when the engine shuts off the oil does not drain back into the block, potentially overfilling the block. It also ensures air can't get trapped in the unit.
Welp, guess what? Top mounted inlet/outlet interfere with the foam block that helps reinforce the bumper from warping at high speeds. It also is likely to contact the bumper itself, and introduces all sorts of installation headaches in general. DOH. So, I had to flip it over just like everybody else. It's been fine and without issues and has worked for me for over 40+ track days at this point
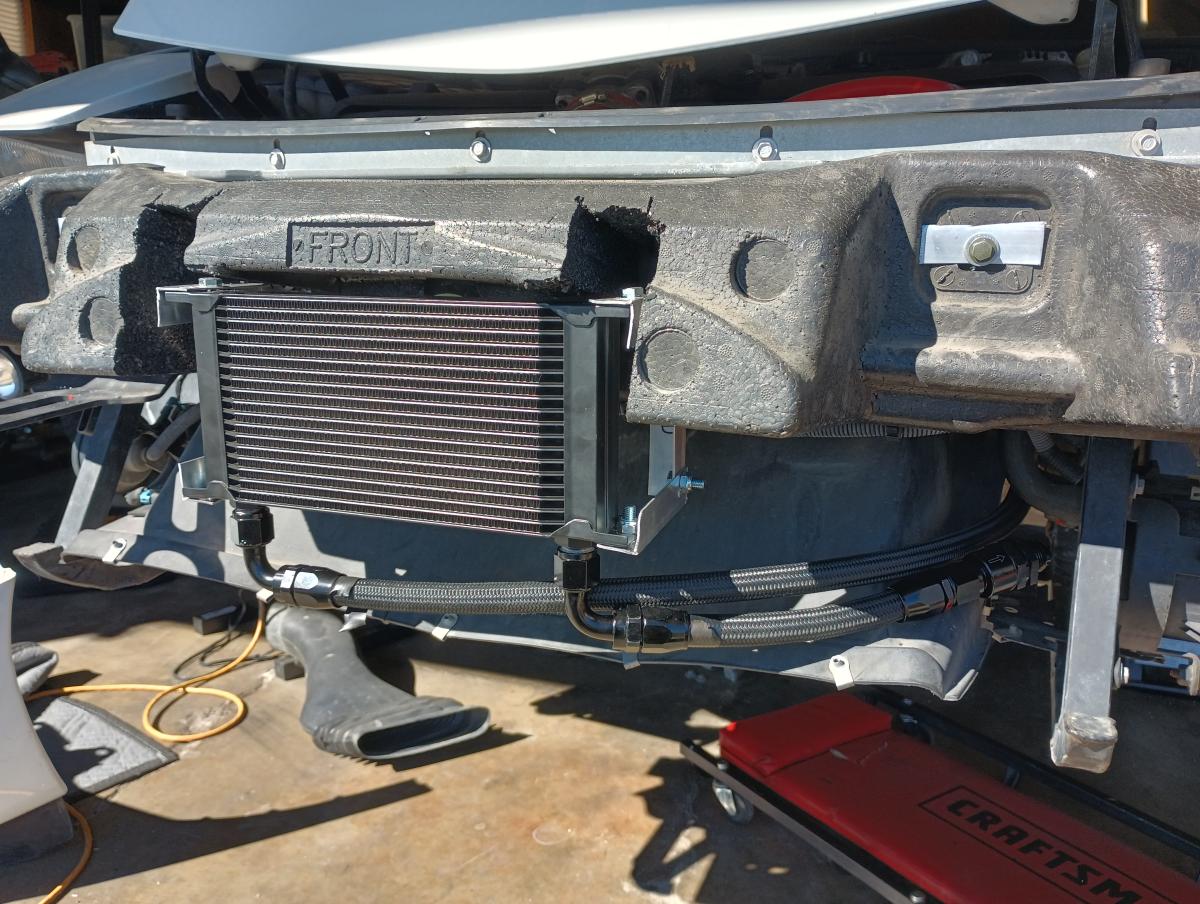
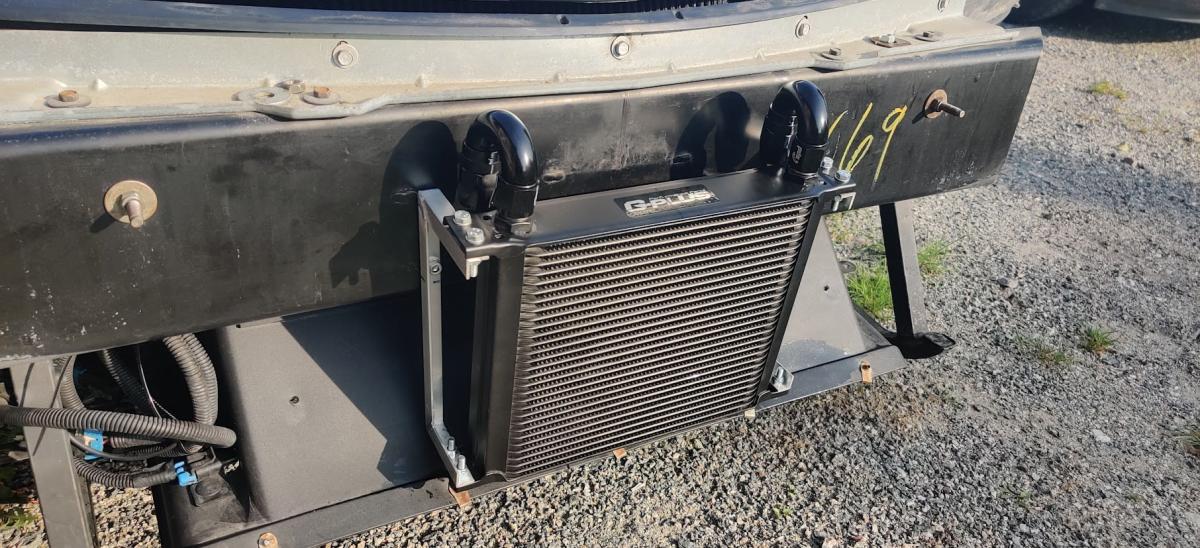
The above pictures are first of the oil cooler orientated correctly with the foam put in place, and then below it is the final state of the oil cooler install with the lines and everything in place. Note that the only difference between the two is I was fooling with relocating the one way valve location, which I also give up on doing as it did not free up significant enough space.
Making AN Lines:
With the oil cooler in place, you'll need to make lines next. This can seem intimidating, but I assure you with the right tools it's quite easy! I highly recommend a Kool Tool to make inserting the ends easy.
With your lines cut to the right length and routed through a gap next to the radiator brace, then through some brake lines, then barely over the steering rack, and then finally it'll go through the space between the block and the engine mounts to keep it all away from the exhaust headers.
Yep, that's a run on sentence, and the routing task really was that much of a headache as you tried to yoga your hands into spaces not meant to be accessed and push hoses through spaces not meant to have hoses. It was a nuisance, but far from unacheivable and in the end it came together, but it's a time consuming nuisance.
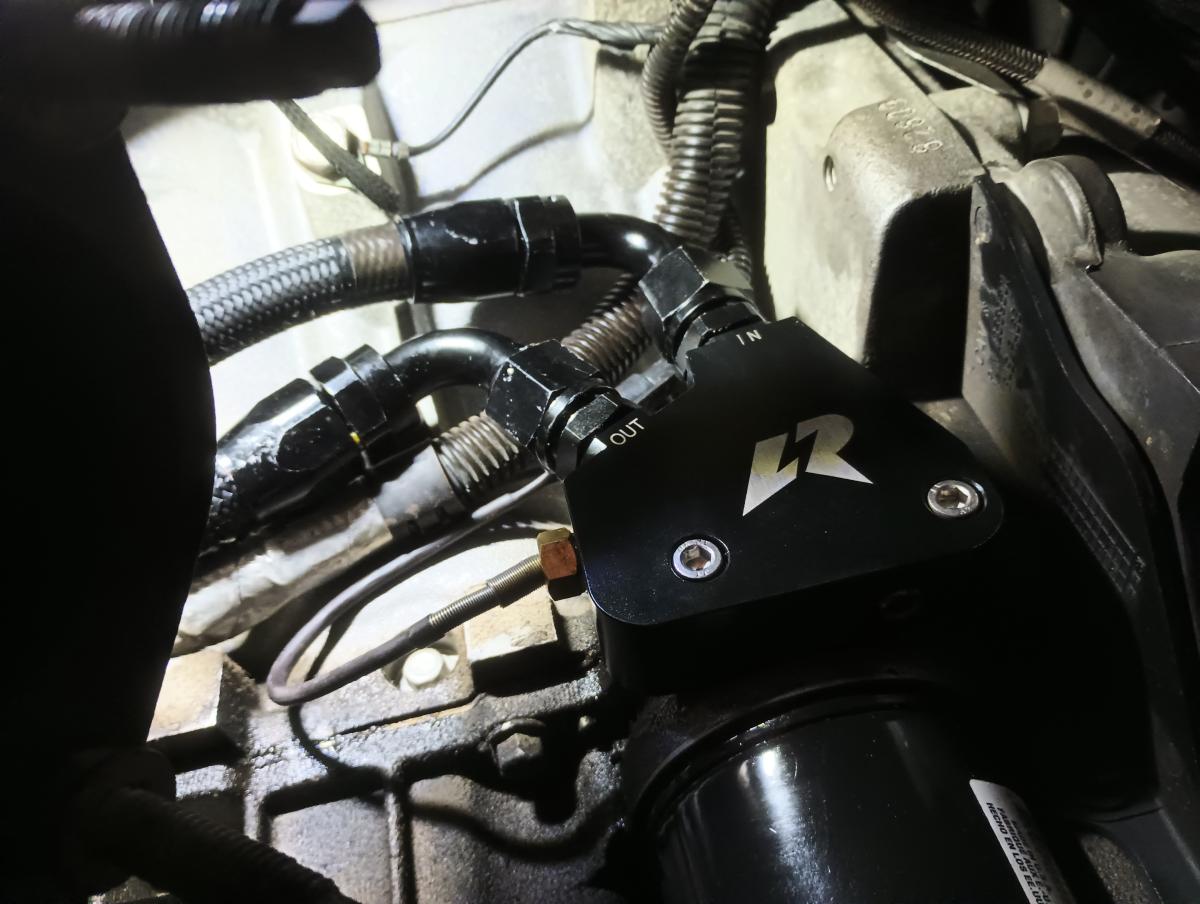
With all that in place, then came connecting the block adapter for the oil lines. This also proved to be a headache as access is challenging to see the least. After fighting with a variety of ideas on snaking my hands or tools up there, it became obvious I was wasting my time avoiding dropping the mid pipe. Dropping the mid pipe added about a lazy hour total to the project, but I probably burned just as much time hemming and hawwing over if I really needed to drop it or not, so just save yourself the time I wasted and do it. Your knuckles will thank you and it will make the job reasonable.
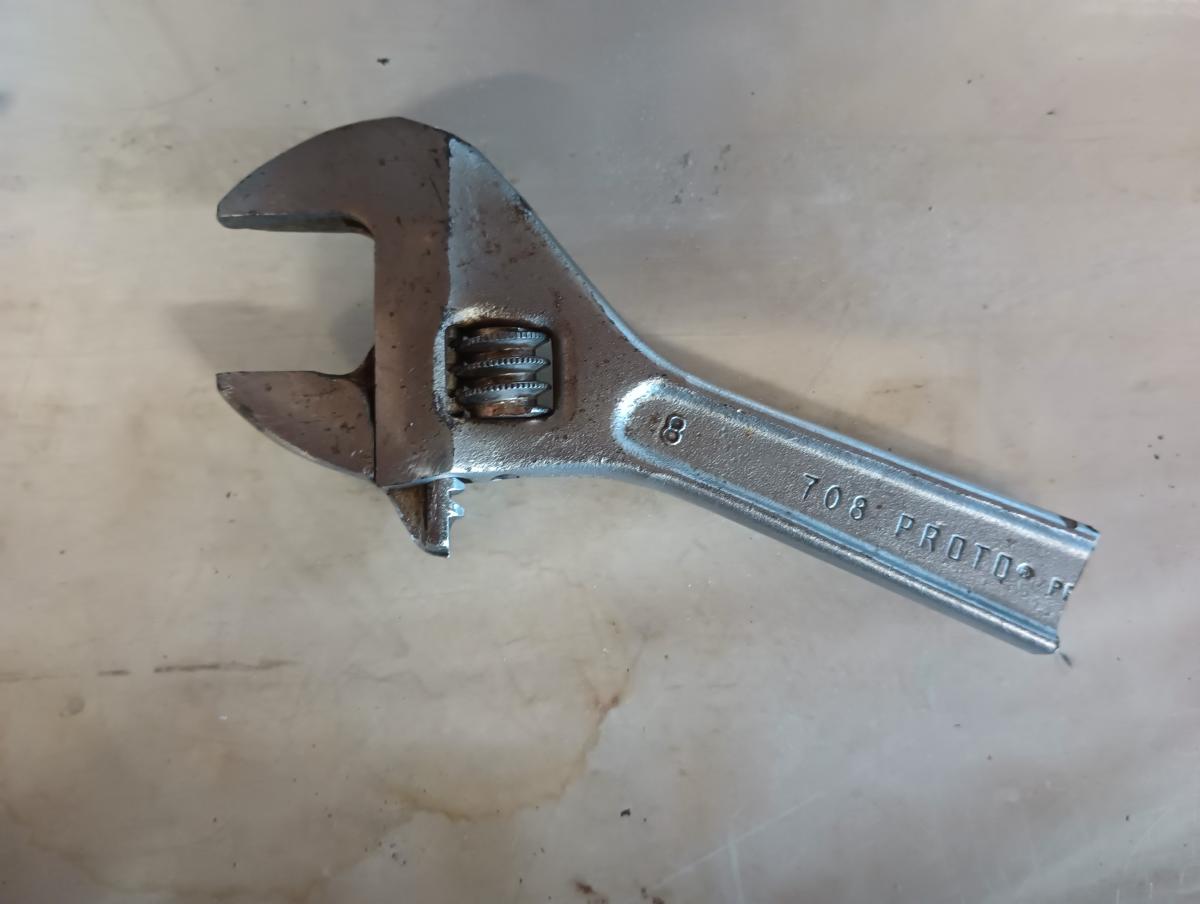
Even with the mid pipe / cats remove, access will be poor for threading the hoses on. What I did was to just cut cheap a crescent wrench down, allowing me reasonable ease of access to snug up the AN connections between the hose and the block adapter.
Useful tip: Some folks have reported good luck with threading the hose onto the adapter first and then installing the adapter to the block. I didn't take that approach and I don't see why it can't work, especially if after test fitting the hose you disconnect from the oil cooler to give yourself some play in the line. If I was to do the job again, I'd try this way first.
With all of that done, I recommend you finalize the install by starting the car and checking for leaks. Please note, you may VERY briefly get a low oil pressure warning before you car returns to it's normal oil pressure, or at least that's what happened to me and everyone else who has done this install. For me and everyone else, it only happened the first time and I haven't seen it since!
If the car isn't leaking once it reaches operating temperature, turn the car off and let it cool. Then snug everything down while it's mildly warm, but obviously don't burn yourself.
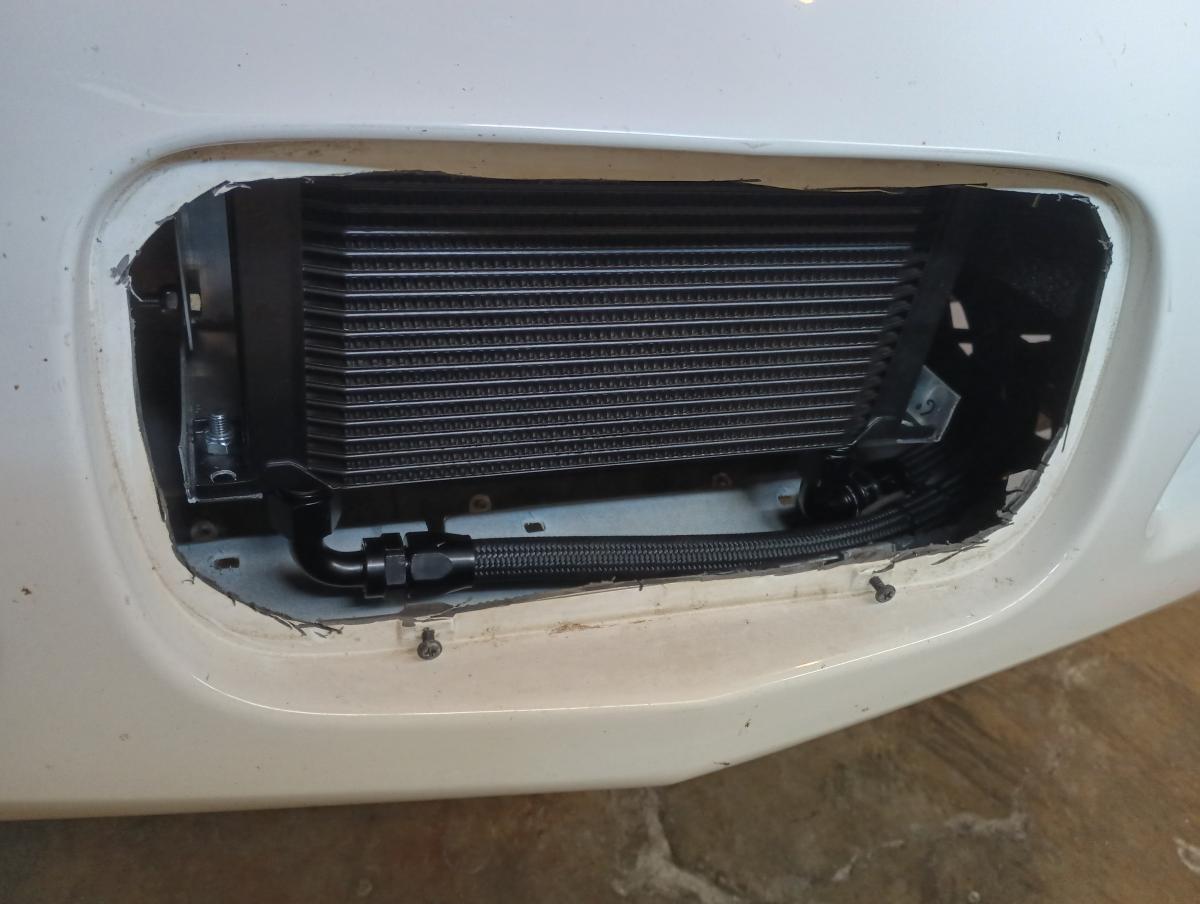
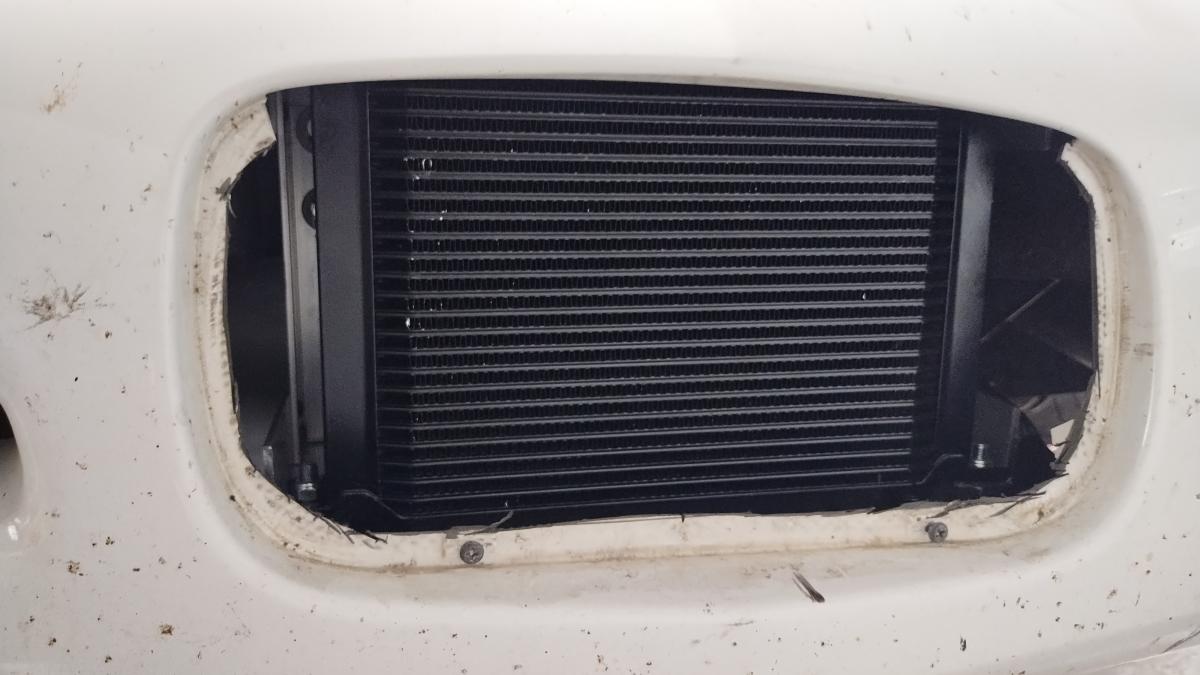
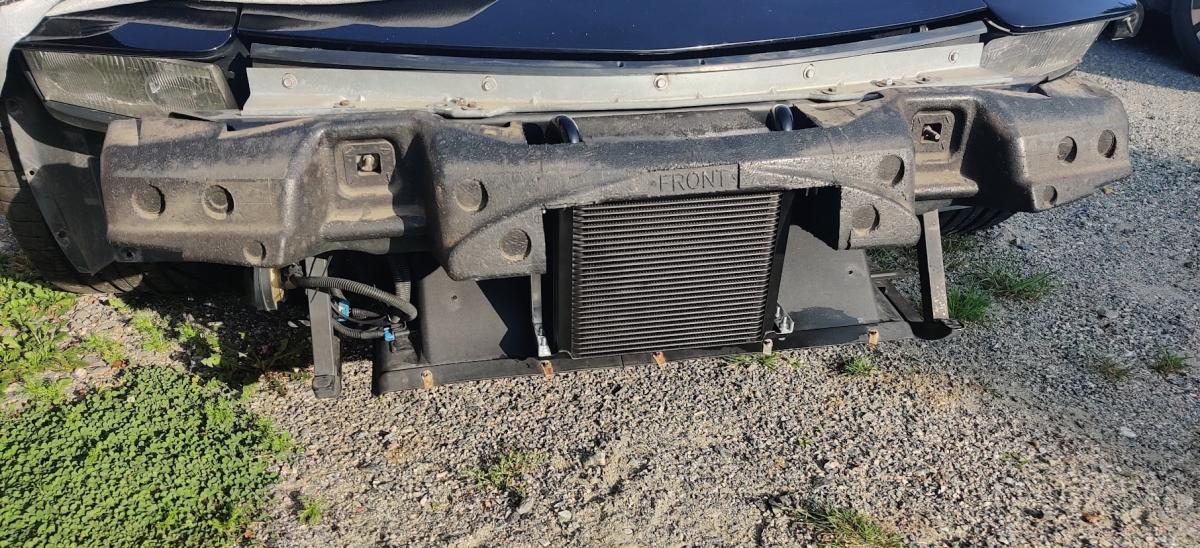
Now, you'll want to reinstall the bumper, with an opening to allow air through to the oil cooler. As you can see here... I did a bit of a hack job with a dremel. I left just a thin perimeter around the outside for my grill mesh to secure to.
With the hole cut, cut some test cardboard pieces to match the shape of the opening. With that completed, add the door trim to the outside of the mesh and secure it utilizing the two screws the originally held in the plate cover. If you don't have them, use whatever small screws you can find, this isn't under that much load so you don't need much.
At this point, fully reinstall the bumper, and you're done!
My Initial Testing Around The Neighborhood
With everything all bolted up finally and snugged down, it seemed appropriate to test it all before I put the bumper back on. I fired the car up, and after a very brief "low oil pressure warning" of 1 second, oil pressure quickly built right back up to 40 lbs at idle. So to all the naysayers citing oil coolers cause low oil pressure... you're bananas I got tons and I'm on an OEM oil pump.
Letting the car warm up for 15 minutes the oil temperatures barely hit 100 degrees with the car had hit 185. The oil cooler seemed to be clearly doing it's job. I did stop a few times to check the oil level, and I found I had to put about 2.25qts of oil into the car to bring the oil back up to the level I like to have it, which is 1qt overfilled anyways to help prevent starvation at the track when cornering.
At no point did I leak oil. I attribute this to using a very small dab of thread sealant on the threads of every AN fitting. Some people will chastize this, as in theory an AN fitting doesn't need this, and infact getting anything between the mating surfaces in an AN fitting can cause an issue. This is correct, if you are using aerospace grade AN fittings. We aren't, and there are imperfections in there and our environments aren't perfectly sterile. It's not unheard of for a fitting to weep, and with a dab of thread sealant, everything worked flawlessly for myself. Bonus points, it has some mild threadlocking characteristics which add some peace of mind.
Having passed the initial check, I decided to take a bumperless journey around the backroads of the area I'm in. I got a lot of funny looks as I drove around, but after about 20 or so miles of slow suburban puttering I was able to get the oil temperature up to 175 degrees. It is worth noting that the coolant temp hit operating temperature long before hand but would never go past the thermostat, so I feel this is a demonstration that the oil cooler was doing it's job.
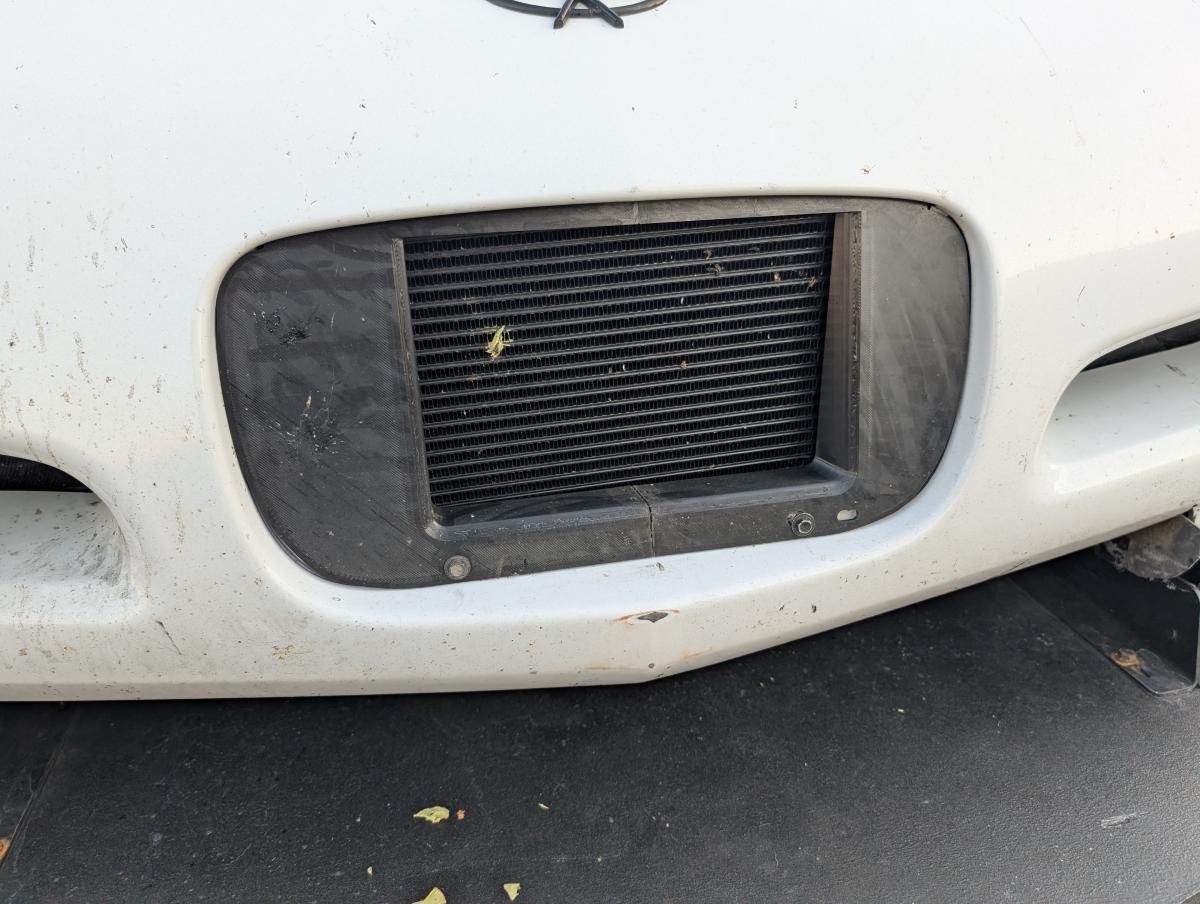
The following day I tidied the bumper up, reinforcing a few bits of the lower air dams while I was in the area, and then secured it all together. The oil cooler wound up quite "stealth" with my configuration. Given the black mesh and the black oil cooler behind it in a backspaced area... no light really got in there to give away that the oil cooler was there.
I took the car on my usual shake down route. It's a 12 mile highway jaunt up the coast, 8 miles back on a slow coastal road, and then another 4 miles of highway back. Temperatures outside were a cool 58 degrees with a moderately cold onshore wind of about 14 mph.
Operating emperature wise on this actual shake down run, the car would not got up to full operating temperature. For me, this is a good thing as it demonstrates the effectiveness of the oil cooling. The car's oil temperature averaged 167 degrees but peaked at 176 degrees, with both oil and coolant temperature being within 4 degrees of each other at any time. I believe this is likely because the block adapter is not thermostatic, and is just always on. This slows down the time the car takes to get up to temperature, which is obviously not ideal for street use, but I'm tracking my car and not taking it out in cold climates.
If you do care about street operating temperatues, one possible solution is to put the normal license plate cover on when driving to and from the track, and only expose the oil cooler when nescessary. The effort may not be worth it though since the car is plenty happy at 176 degrees, and warmer day time temperatures or more spirited driving may affect this as well.
Track Testing The C5 DIY Oil Cooler Setup
Since writing this article I've had over 20 days at various tracks with this setup!
Prior to this install, at track events I was regularly seeing 274-285 degrees as a peak temperature during my quicker laps, and this was on 45-55 degree coldy windy days. This is also often at "low speed" tracks with top speeds around 108mph or so, with lots of tight technical turns and elevation, so not as much enigne load, but also less wind accross the radiator and oil cooler.
With the oil cooler my oil temps never exceeded 234 degrees, and this was on hotter 65-75 degree days with minimal wind. I also noticed coming off the track and going for a short cool down my oil temperatures would quickly drop another 15-20 degrees, where as before oil temps would not drop nearly as quickly.
Unfortuantely, my oil temps did pick up yet again once I added a splitter, but this time the all time peak was 282 degrees after pushing the car through many back to basck sessions in 110+ degree temperatures. I can't imagine what would happen to my car without an oilc ooler! At the same time I also discovered a small leak in my coolant expansion tank, whish was preventing that system from fully pressurizing, which in turn meant my water cooling system was not working as effectively as it could.
After 20 track days though and tons of testing... I have to say this setup is tested and effective. I've not had any oil pressure issues, I've definitely kept my car well under concerningly high oil temperatures, and in general this bought me a lot of peace of mind!
A note to those who claim this causes increased air intake temperatures
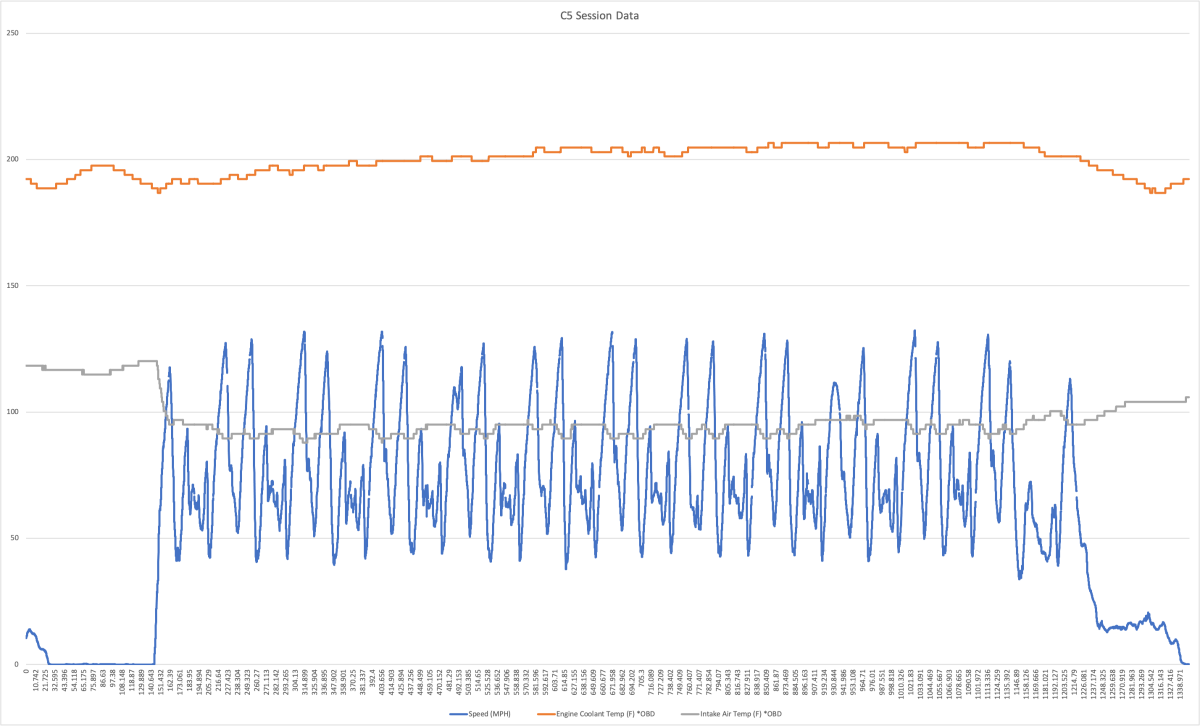
The chart above demonstrates time (x axis) with speed graphed in dark blue, coolant temperature in orange, and intake air temperature in gray. As you can see, the intake air temperature drops down to about 90 or so degrees and olds pretty steady for the entire session. While ambient temperatures that day were around 70 degrees or so, the Corvette does pull air from inside the front bumper, which is affected by the engine bay overall. I'd contend that with the data above having an oil cooler added does not influence intake air temperatures any excessive amount compared to non oil cooled configurations!
25 Row Oil Cooler in the C5 Corvette
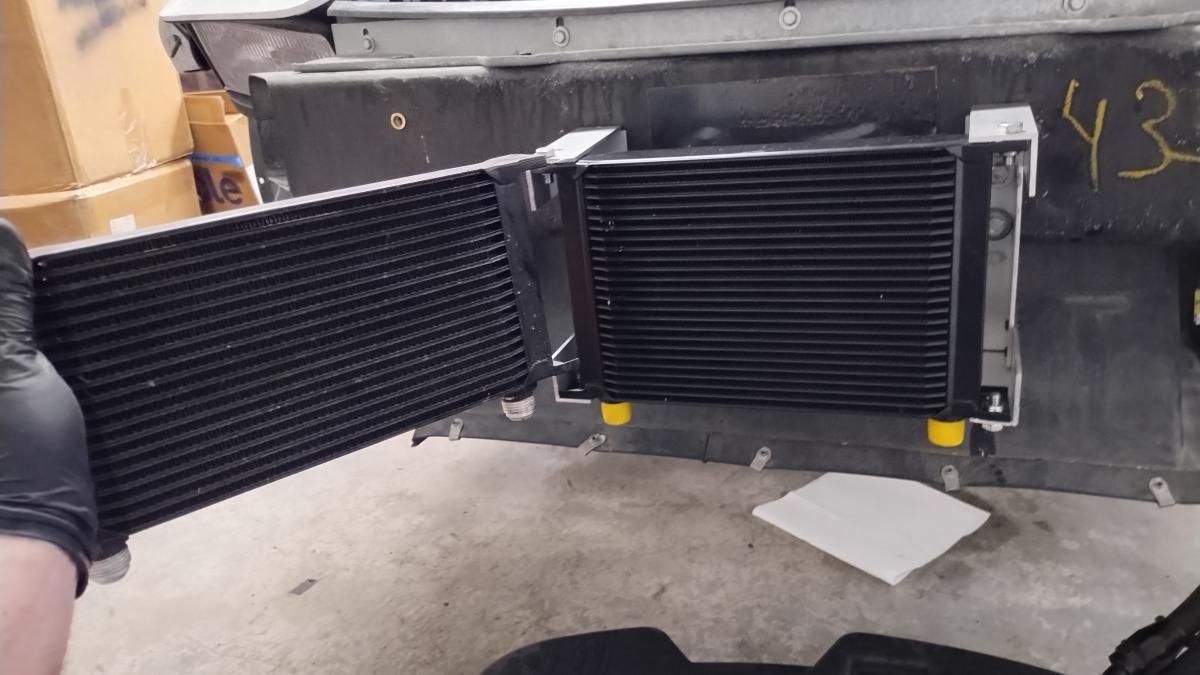
Recently as part of doing some modificaitons to my C5 Corvette for more power, I found myself thinking I would benefit from some additional cooling. The original plan had been to figure out a forward leaning radiator, but that simply wasn't going to happen with my limited amount of time in the winter. So, pondering on the whole thing, I noticed there was some spare room below the oil cooler... I could fit a big ooler cooler right? Then I checked the measurements of the cooler on Amazon, which was dumb because you can't trust Amazon, and oh look it's "Only 3/4" taller" so I might as well get it. No, it's more like 1.75 inches.
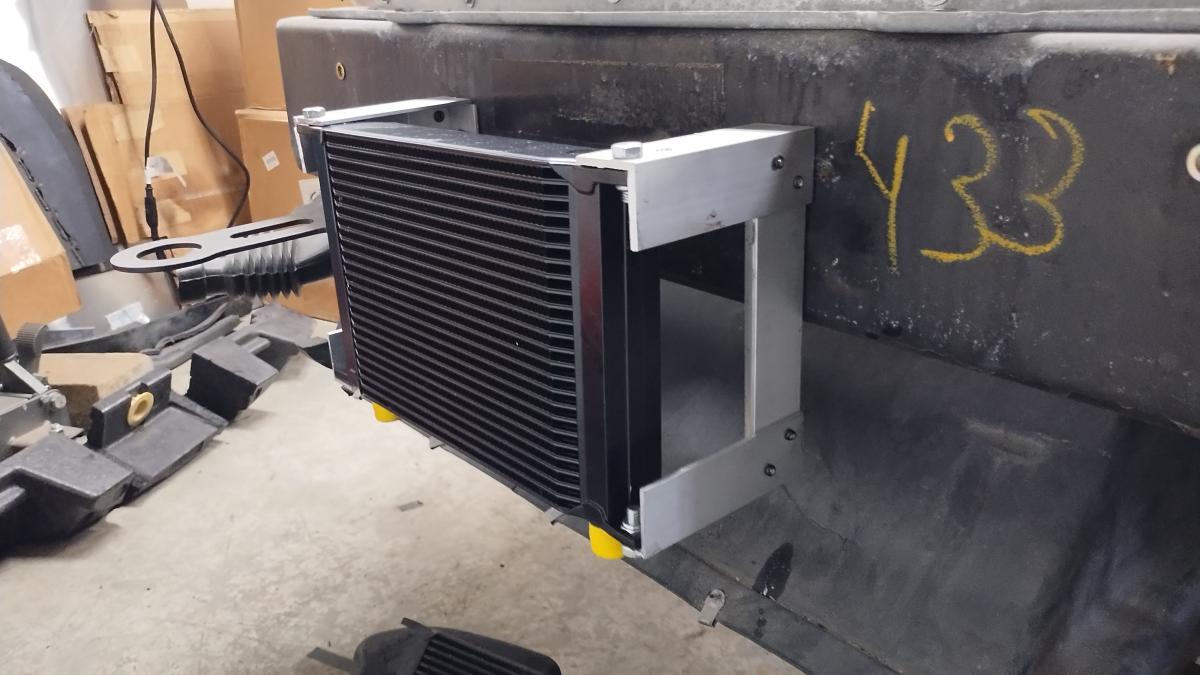
As Idiscovered the oil cooler was so much taller than the other oil cooler, I deduced I'd need to raise the height of the oil cooler mount 3/4" or so, leaving 1" on the bottom, which should indeed clear. I took some much larger and nicer angle aluminum, made all my cuts and measurements, remade some cuts and measurements, and then riveted the whole thing together as you can see. The frame looks MUCH cleaner than the previous iteration, which is mostly a reflection of the better availabilit of DIY materials near me combined with me being in a shop versus my previous temporary stay in a garage.
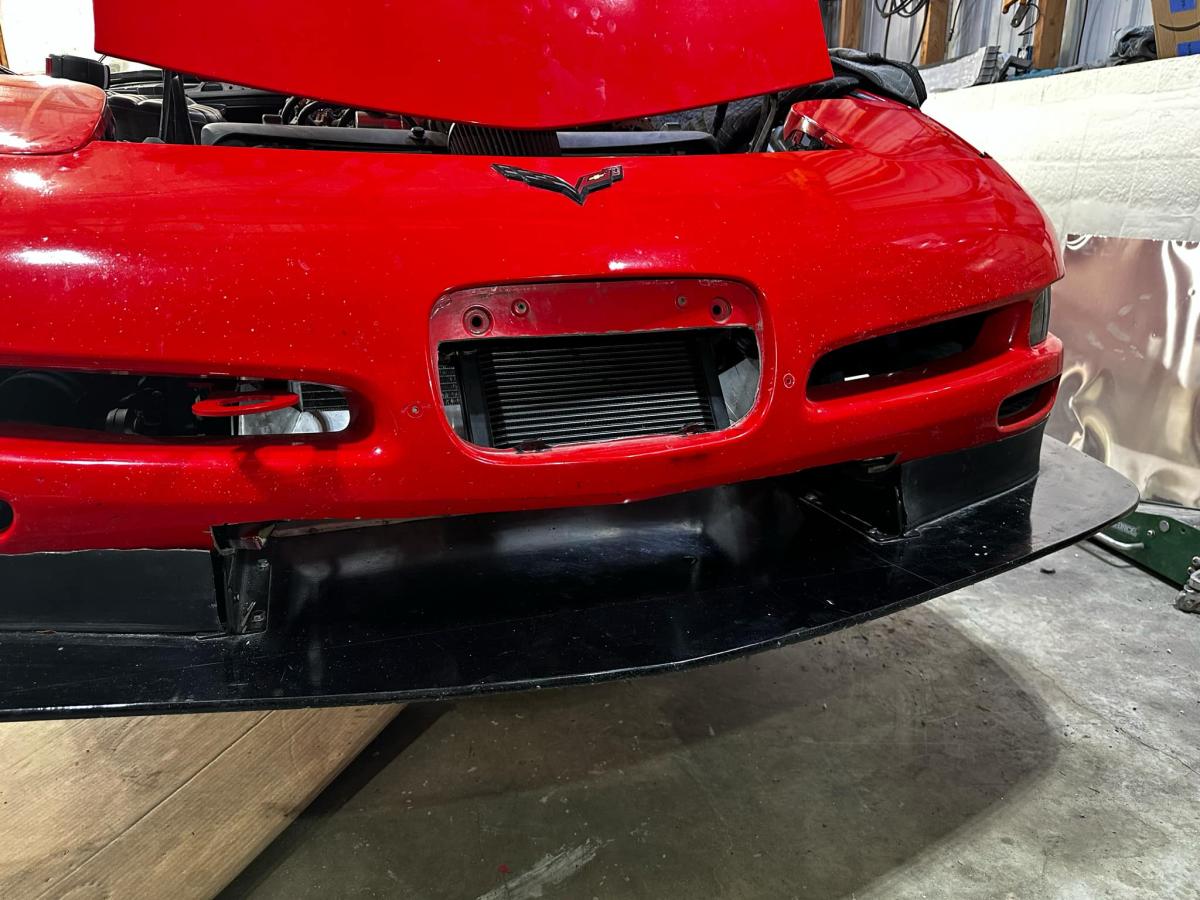
As I don't think the first picture fully captures the difference in size of the oil coolers, here's one that might better demonstrate the oil cooler size difference. The new oil cooler takes up the whole space behind the license plate mount in the bumper, and actually has about 1/2" up above the top of the opening, so it surely is utilizing all of the airflow coming in through the bumper now.
Here is the oil filter just in the cutout gap. Yep, the cuts aren't pretty, and I could gussy it up, but it ultimately doesn't matter since it'll be covered with grill mesh and function wins over form for me on this car!
How the Larger Oil Cooler Worked at the Track

So initial testing is in, and it's looking promising! Turning a faster lap time than I was turning with the previous oil cooler and lower power motor... my oil temperatures averaged 245-250 degrees where previously I'd average 270-275 degrees at the end of a long session. Peak temperatures were not all that improved though, cooling was notably quicker, as I would leave the track and temperatures had already dropped down 20 or so degrees, which was not the case with the previous oil cooler.
Tempering these initial positive initial results though is the reality that the day was quite cool, with temperatures around 50-55 degrees farenheight. I'll continue to update the improved effectiveness of this oil cooler as I am attending track days with higher ambient air temperatures.
Front Oil Cooler Ducting
So an astute observer might notice with this setup... hey there's a LOT of room for air to just go around the oil cooler and not through it! Well, that person would be right. One of the key ways to improve radiator effeciency is to make sure all of the air has to go through the radiator, and the oil cooler shouldn't be any different.
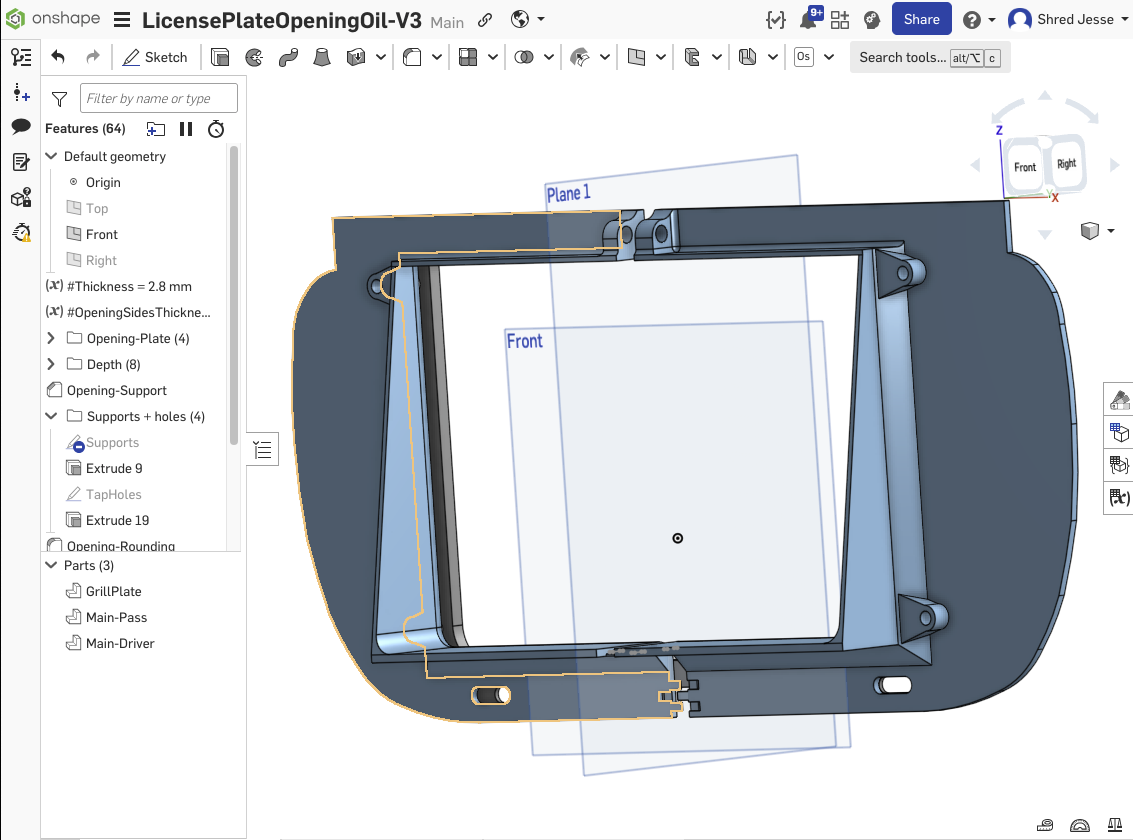
I began with designing a piece up in OnShape (link here goes to the design). It took a lot of measuring, and a lot of "take a photo with a measurement in it, import, scale, test print small piece, okay deal with lens curvature... etc etc.
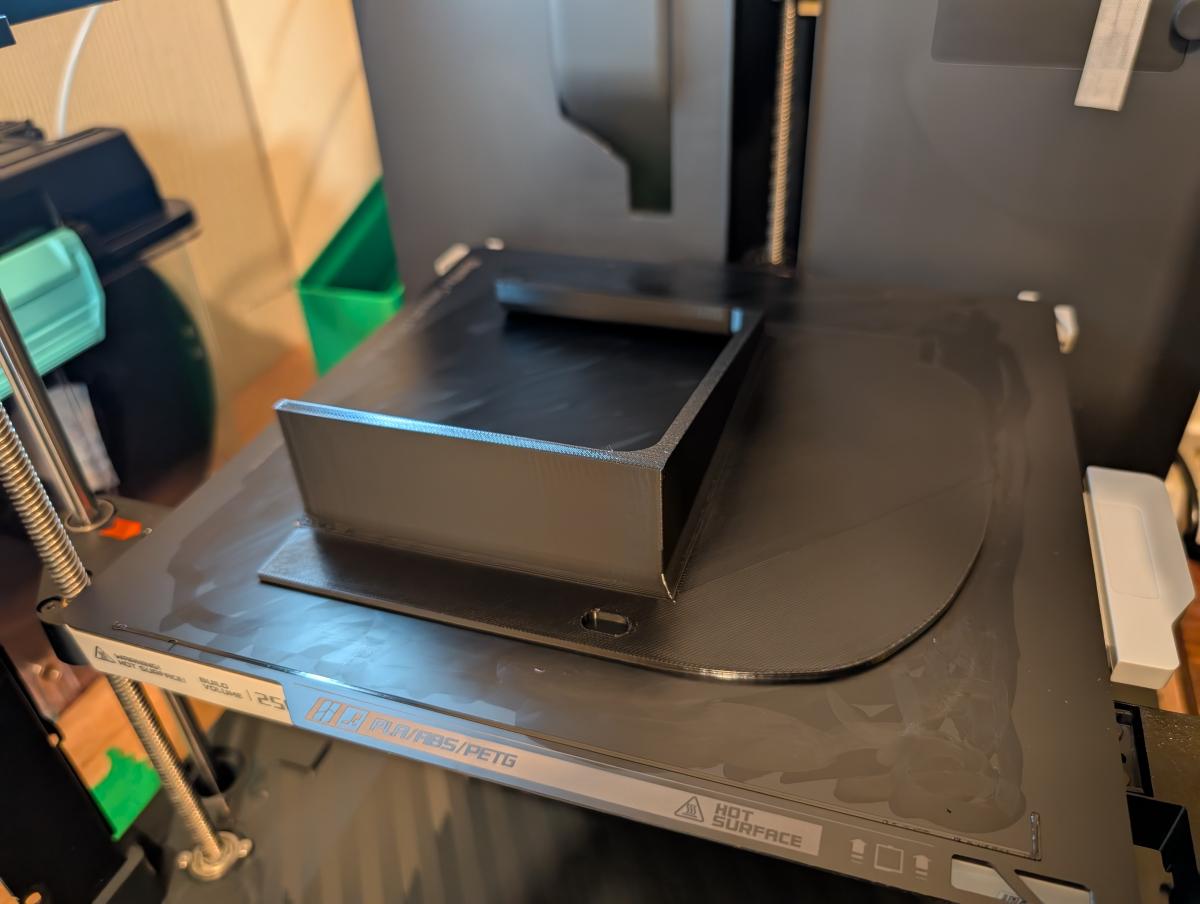
Next up was printing the piece. I've shared a few places that I love the Bambu P1P and I also have been using Creality PETG for printing parts. It took a few test prints, but I was able to design something up.
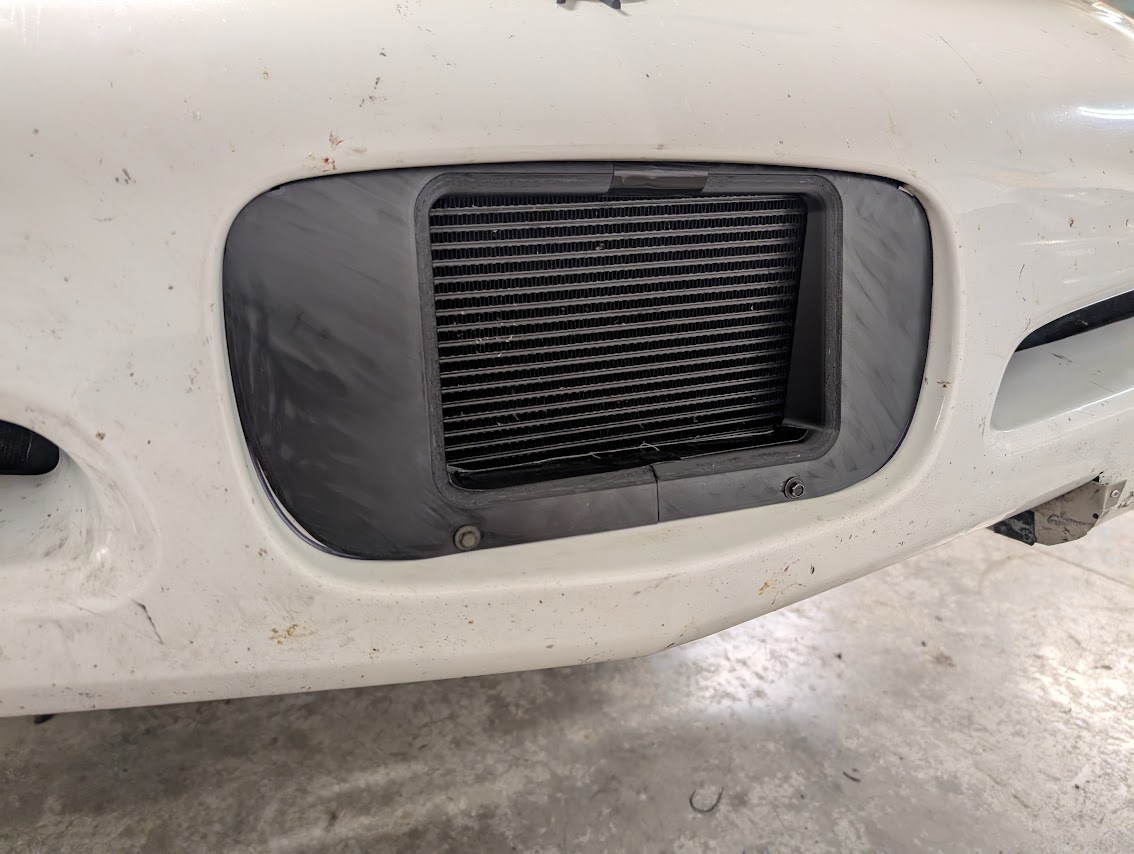
Here is one of my test prints on the car. Now the air has to go right into the oil cooler. Please forgive the imperfect surface, I hadn't yet cleaned off the print release layer. You'll also notice some use of gorilla tape and a seem at the bottom. I had to print this as two pieces as it's a bit wide for most 3d printers.
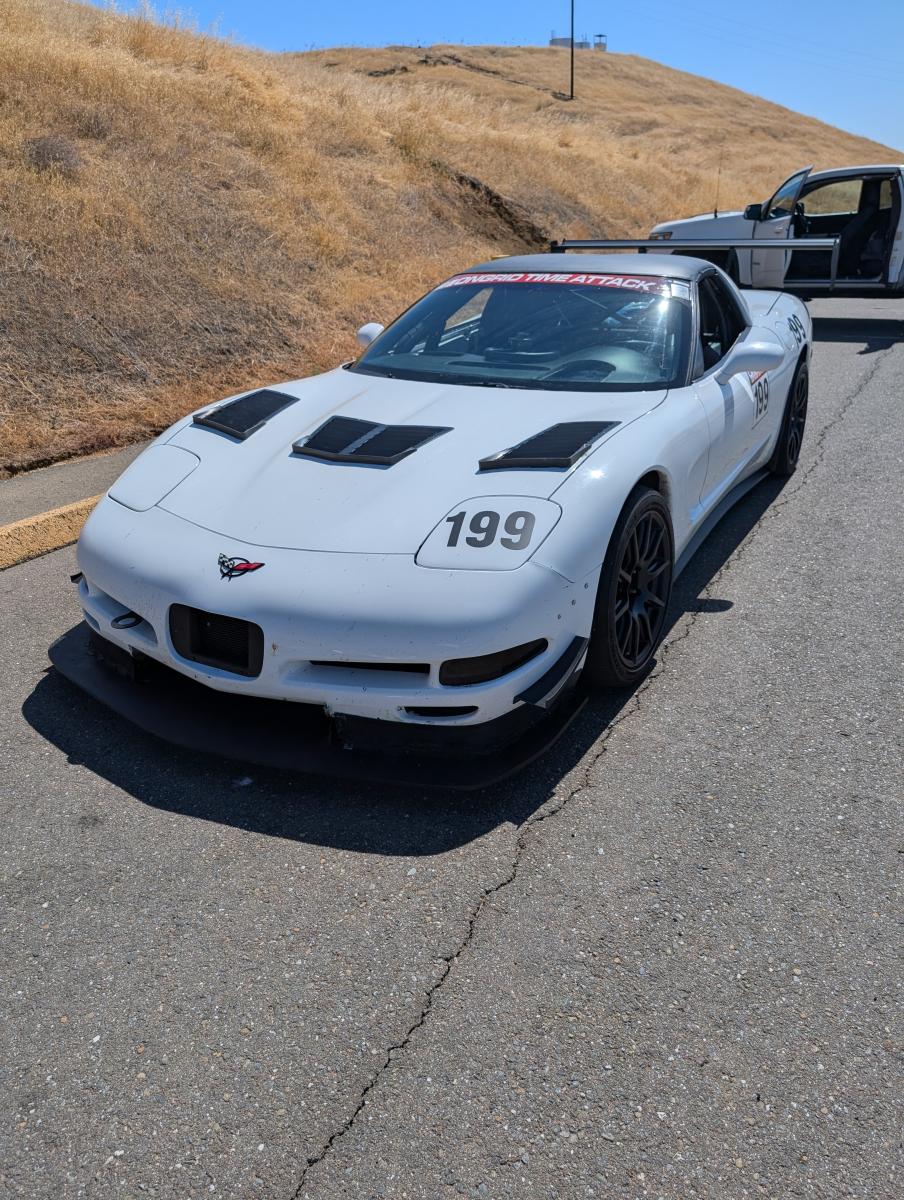
Here it is on the car for a hot event at Thunderhill West. Can't see it? Yep... it's a bit of a low profile location that most folks can't see.
The oil cooler worked... pretty much the same as far as I can tell. Temperatures peaked at 265 degrees, and that wasn't anything new. That said, many cars were struggling in temperatures, with a few puking their coolant out when they came back to the paddock. Let that be a testimonty to giving a car a proper cool down lap and not just going straight to your spot and turning the car off. Take it for a short cruise to keep coolant and cooler oil moving around, otherwise it'll sit in the block and cook off!
My overall observation... it probably worked, but it wasn't some staggering 5 degree difference I can put to just yet. More testing will ensue!
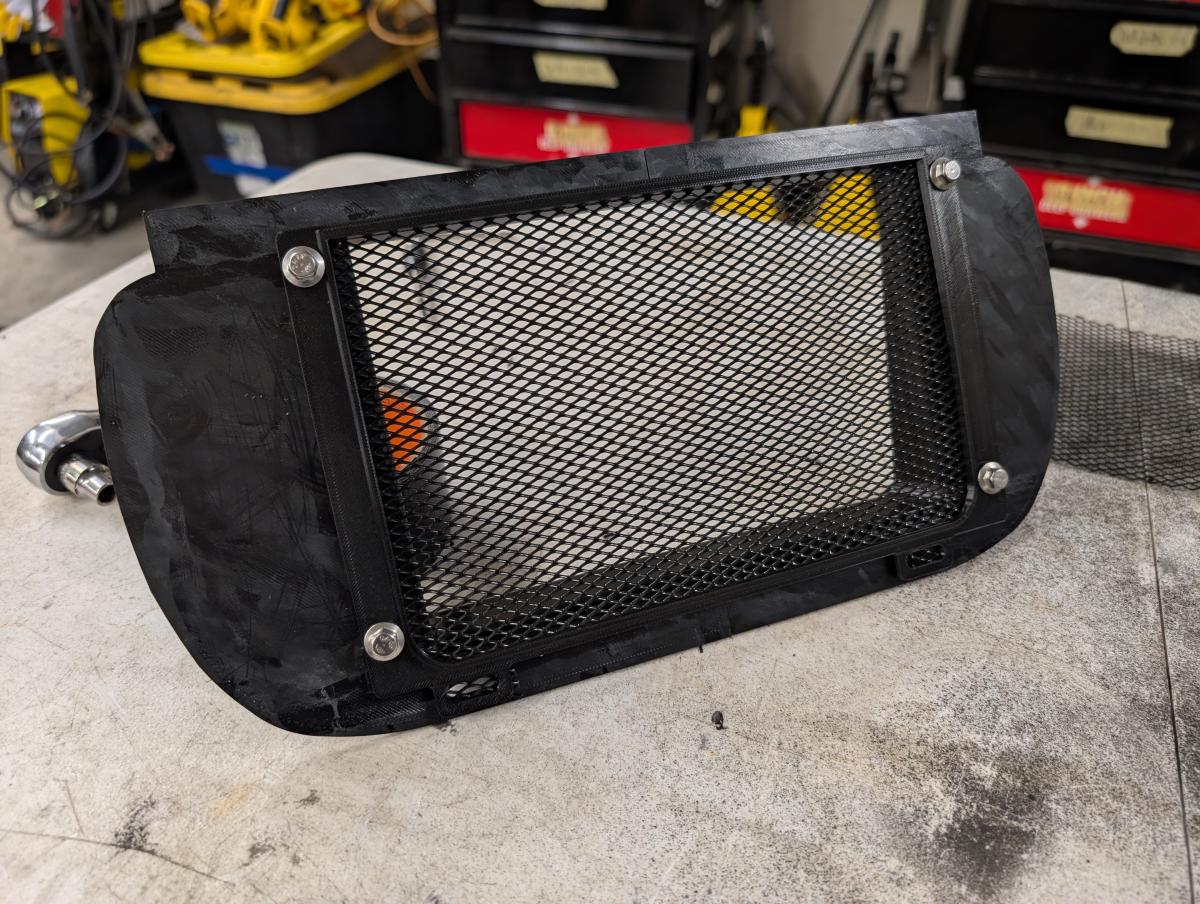
One problem I did have was that my oil cooler was caked in bugs. Force all that air through the cooler, and everything else in the vicinty is going to go with it! The oil cooler face was also exposed, allowing track debris to hit right into the oil cooler. That's not okay! So I designed up a top plate piece that will hold groill mesh in place over the vent to help take the hit from track debris.
Is the grill mesh cover robust enough to take multiple hits from rocks or heavy track debris? Probably not. What it will do though is act as a sacrifical layer to take a hit before your oil cooler. Think of it like how the space station has an exterior sacrificial layer just to take hits from space debris. That initial hit steals pretty much all of the thunder from whatever was going to damage the space station. In this case, a big hit will surely destroy your mesh and possibly damage the duct as well... but it's better than taking a direct hit to your oil cooler!
More testing will follow on this piece! Look for an update!
Examples of Other Folks Improvements on The DIY Oil Cooler
Above is a really good example of how you can get the oil cooler to have the hoses on top... just angle it! Thanks to Wesley C. for sharing what he did.
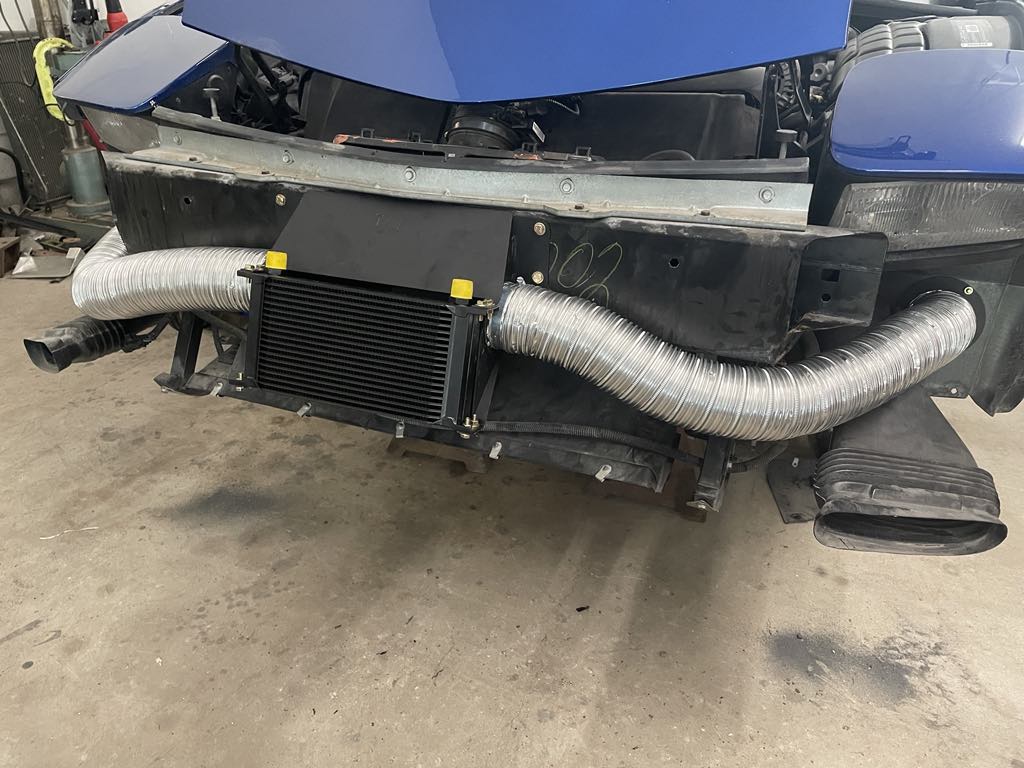
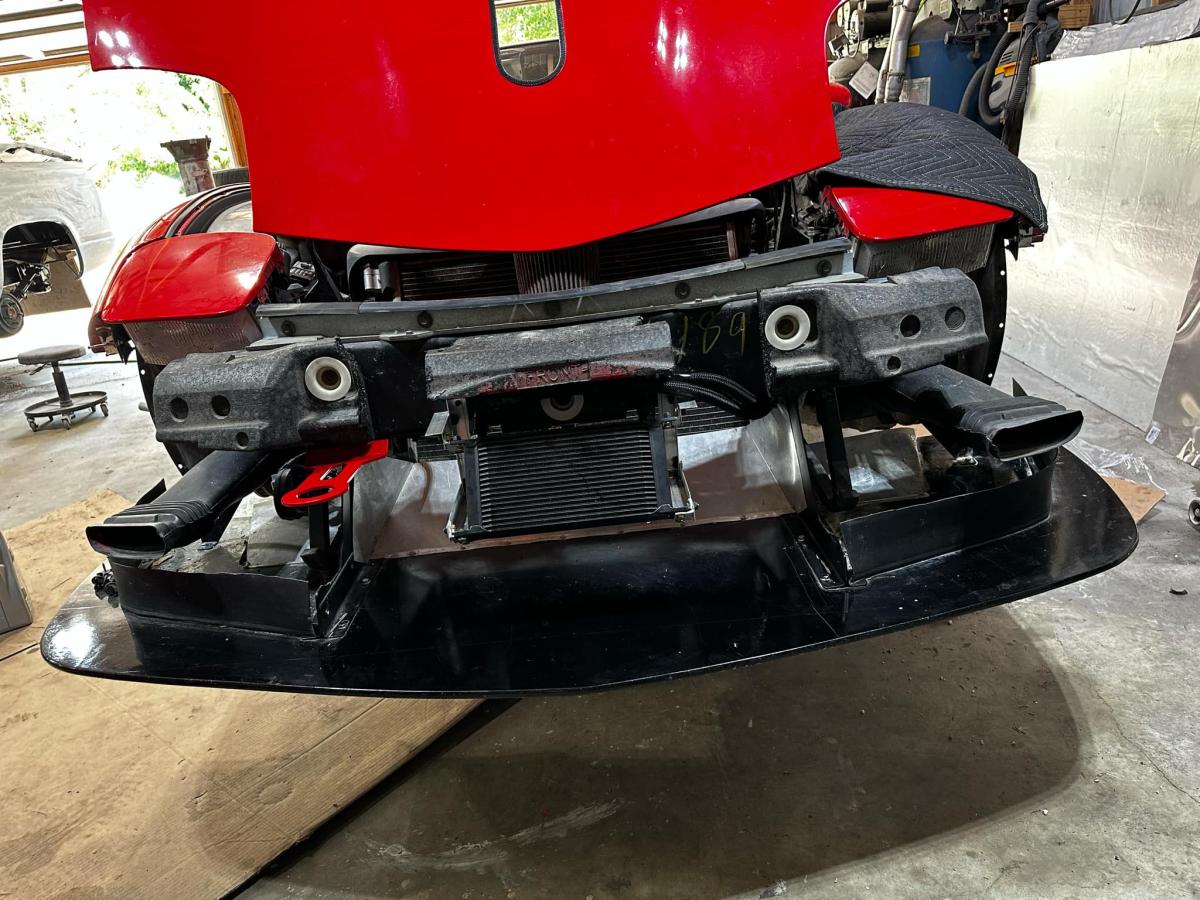
Above is an example of how serious you can get with the mounting and ducting! Stefan K. did this and he set it up so the air enters through the cooler and exits out into the tire well. Pretty slick work!
Above you can see where an individual named Hans mounted a HUGE oil cooler on their C5 Corvette and also managed to get it so the hoses exit on top!
Here you can see how Hans trimmed the foam as well. This is a DEFINITELY going to add some massive oil cooling up front!
Parts used by Hans: