Durable And Renewable Off Grid Power and Connectivity Solution
We were quick to discover the shortcomings of our A-frame camper's remote capabilities on just our first outing. My fiance and I had traveled to the far side of Mt. Hood to get out of the rain, and while we mostly avoided the rain, it was quite cold. We ran the propane heater for all of the first night and through noon the next day. Suddenly... the heat stopped working. The blower would spin up and blow a bit, then turn itself off without generating heat. Oh great... our new camper's heater had failed! Troubleshooting was interesting. Was the propane out? Was there an issue with the heater itself? We decided to plug in the generator and switch to the heat pump, but before I got to heat pump, the thermostat settled on furnance, and it kicked to life with ease. Come to find out, the battery had drained too low to ignite the propane furnance.
This early problem quickly demonstrated the shortcomings of our A-frame camper, and most A-frame campers we would wager. The shortcomings were:
- While propane will last a very long time (easily a week) a cheap-o 75ah battery won't last 12 hours of even modest usage.
- With no battery monitor in place...
- You just don't know how the battery is doing until it's not functioning anymore.
- Troubleshooting issues is difficult because you just don't know when the battery is dead.
- You will run your battery well past it's ideal lowest state of dischrarge, reducing it's lifespan a moderate amount.
Fortunately for this initial experience, I had already purchased the first piece of the puzzle: A Craftsman 3000 watt inverter power generator. We hooked up the generator, and in no time we were back up to a battery that could run the heater blower overnight, and we were able to operate anything we wanted all day. I can't say "fully charged' because again, we had no battery monitor so it was all just hoping. When it comes to my well being, I want to know, not hope.
This experience highlighted the most significant weakness in my Boondocking delusions. The operating theory behind this camper is that my Fiance and I want to persist for notable periods of time in remote locations. I need to work remote so power will be essential, and my Fiance will also be working or studying for her masters degree. If we can't persist for one night on what we've got without resorting to gasoline... how is a week going to go?
Scotty, we need more power!
The plan: Get 200ah of battery power, get more than enough solar power, (300 watts) and get a Mobile Cell signal booster. Wire it all in, upgrade whatever you encounter along the way, and in the end have a pretty rad configuration for staying off grind. The solar should help minimize how often we have to run the generator, the Cell Signal Booster should let us operate in more remote locations with connectivity, and the upgraded battery should let us persist further between generator runnings or persist through a cloudy day until sunshine returns.
Phase 1: Power storage, IE: Battery
The battery that shipped with the RV claims to be 100ah, but I'm suspicious of this. It's also not a sealed lead acid battery either, and possibly in a questionable state of affairs. An upgrade was in order.
Lithium Iron batties are continually touted as the golden standard to maximize energy storage and discharge, reduce weight, along with increased battery life and discharge capability. That said, the price of a 100ah lithium Iron Battery is same cost of the entire project I've undertaken on this RV. Lithium Iron was just out of the question for cost. There are also notable amounts of information on their shortcomings in cold environments. Given I hope to use this to occasionally get first chair snowboarding, I'd have to say that double rules out Lithium Iron.
So the option I went with was a 200ah Sealed Lead Acid Battery, which is packaged in a 4D group size battery. We were able to install the new battery were the previous battery box was, with some moderate fabrication to hold the significantly larger battery box.
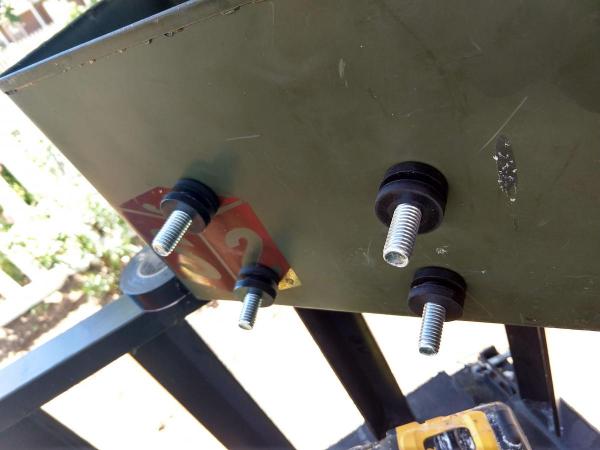
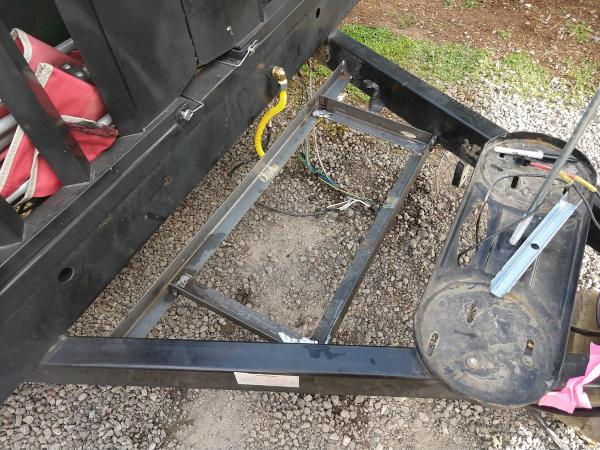 The above picture is of the battery box tray we fabricated and welded into place. Unfortunately we don't have the previous smaller one to demonstrate, nor a picture of how good it looked once we cleaned it all up and painted it. Also note the 90 degree turn on our propane line. We've acquired a better fitting since this picture, as that one was incorrectly provided to us and was not a 1/2" flare to 1/2" flare, it was 1/2" pipe to 1/2" flare.
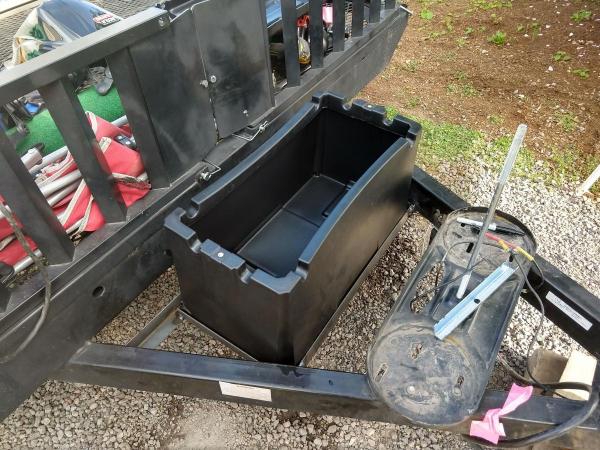
Above is the Battery box, placed in the new tray. The propane is routed out of the way of the Battery, and we now have storage for a 200ah Sealed AGM battery. All said and done, not bad not bad.
Final picture of the complet installation of the battery to come.
Phase 2: Upgrade the OEM Wiring.
I wasn't thrilled to pull up the access cover to our primary electrical area only to find that the installers favorite tool for electrical was wire nuts. Modifying the camper was going to require doing much of their work, as the wire nut situation was suspect in implementation, but they had even gone so far as to pigtail from one wirenut to the next when they couldn't jam enough negative connections onto a particular wirenut.
So this process began with the simple goal of making this system something I could quickly and easily expand upon, while increasing the gauge of wiring, and replacing the wirenuts with bus bars.
Pictures to come on this.
After the initial wiring was completed, it was time to move onwards to the additional inside components we would be adding. The cell phone booster, cigaratte lighter style 12v power outlets, and a Vitron Bluetooth Battery Monitor BMV-712.
I purchased a large box from Amazon to mount everything inside of. The plan from there was to place a small fuse panel inside of there from which to run any additional power from. All new circuits would thus be fused from one central convenient location. Toggle switches can also be added to the front as well. Here's some pictures of what I have built and will be mounting inside of the camper.
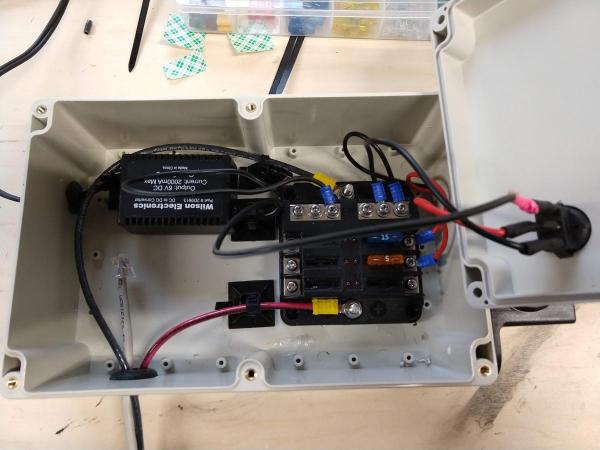
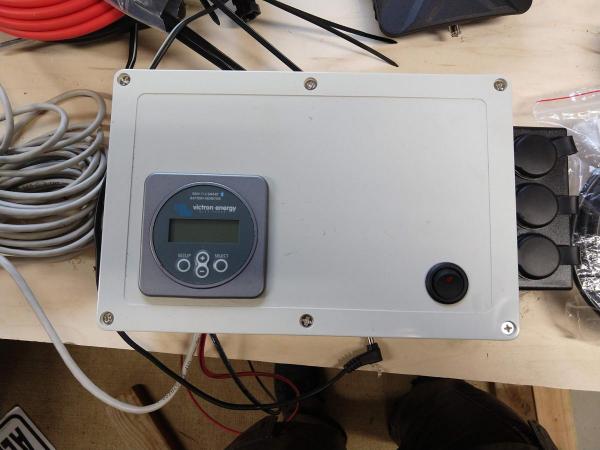
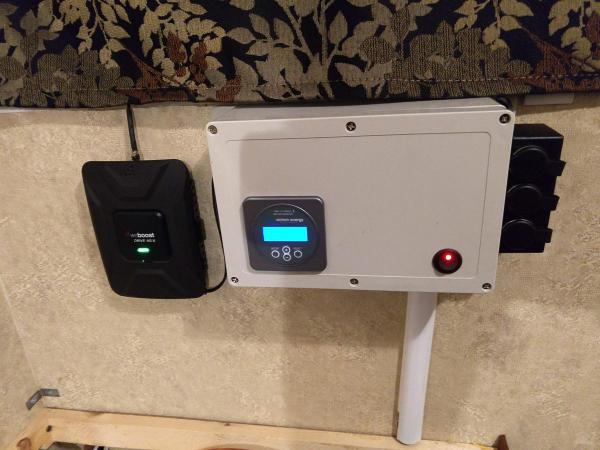
The above picture is of the final installation, minus the exterior antenna cable which is covered in a later part of the install. The switch works and allows us to turn on or off the WeBoost Drive 4GX setup. Seems sensible to me to save the 0.5a it draws, along with there will be times we just don't need it, such as when we're driving! The Victron Battery monitor is accessible, and the 12v acessory plugs are also accessible and functional for charging devices.
Phase 3: Add 200 Watts of Solar Panels to the roof
Next up, Solar power. Fortunately for me, the Canvas I had to work with really dictated just what I could do:
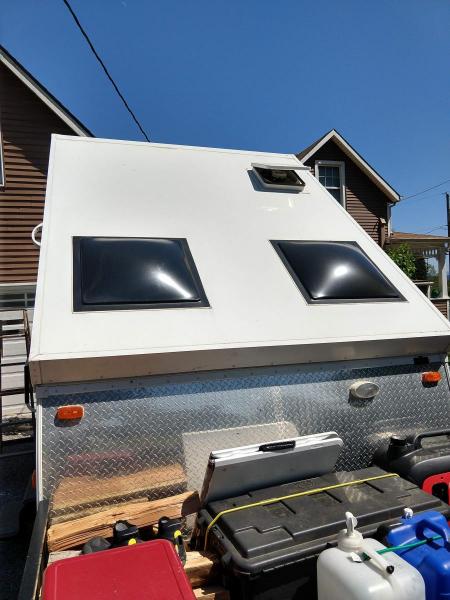
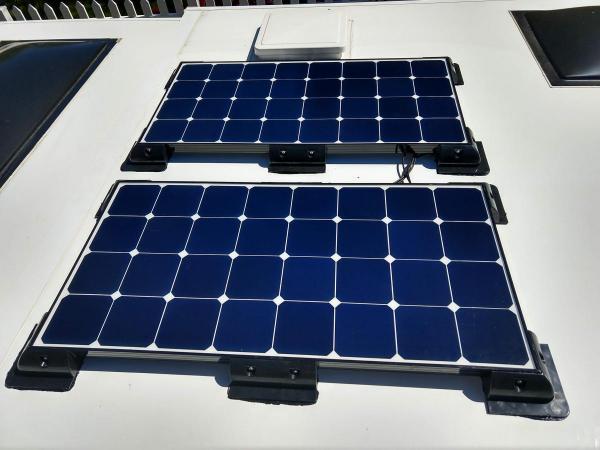
The space above the windows, and to the left of the Fan vent was pretty much the only large flat space available to me for mounting solar panels. The dimensions, when measured, left enough space for 2x 100watt solar panels, and "no drill" mounting hardware for the panels to the RV itself.
This mounting location does have some imprefections, such as if they're facing North and we don't get good sun exposure. The main benefit of these though is if we park for the night, camp out and use power, then drive again the next day, they should charge the battery while we're out driving around!
For the actual panels I went with, I chose Renogy Eclipse Solar panels. By the time I decided to pony up and purchase solar Panels, these were already on sale. The choice again became obvious, as these are lightweight for this type of solar panels, it utilizes the most effecient cells Renogy has to offer, and the real kicker for me was "Bypass diodes minimize power drop caused by shade and ensure excellent performance in low-light environments." That means that I can still expect a bit of power to come in on partly cloudy to overcast days... which are essentially the norm here in the Pacific Northwest. Even if the power coming in is meager, it will still help offset power being used.
For a solar charger, I went again with a Renogy brand product, the Renogy Wanderer 30amp PWM controller. I got it used for cheap on Craigslist, and while it lacks all of the cool bells and whistles and I probably will upgrade to MPPT in short order, it more than does the trick for right now. Plus, given I will have an excellent battery monitor in place showing power coming in versus out, I can feel pretty confident that my Solar Panels are doing their thing.
Last was mounting. I went with Renogy "no drill" or "drill less" mounting plates. I keep putting those in quotes though because I chose to drill and screw the mounting plates to the panels themselves, only resorting to Sikaflex 221 (adhesive) to attach the mounting plates to the roof itself. Other RV'ers have posted up that they've had years of luck with just Sikaflex, so I feel pretty darn confident this will do the trick for us for years to come.
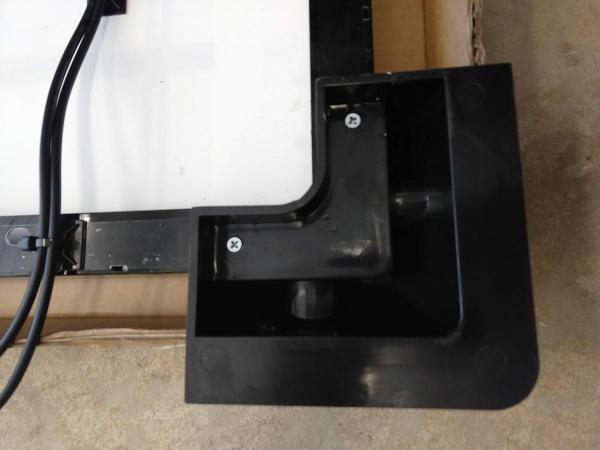 The above picture is of one of the No Drill or Drill less renogy mounting plates attached to the panel. We screwed from the bottom, and the sides, AND put Sikaflex in there to really make sure that these stick.
In Hindsight... I'd probably do this differently. I'd only run two scres from the sides into the panel, as you can access these screws and remove them to install a new panels. While what we did is incredibly scure, we've got our work cut out for us if either of these panels were to fail. Fortunately they're high end panels with 25 year warranties, I feel confident these will outlast this RV's size effectiveness for our family.
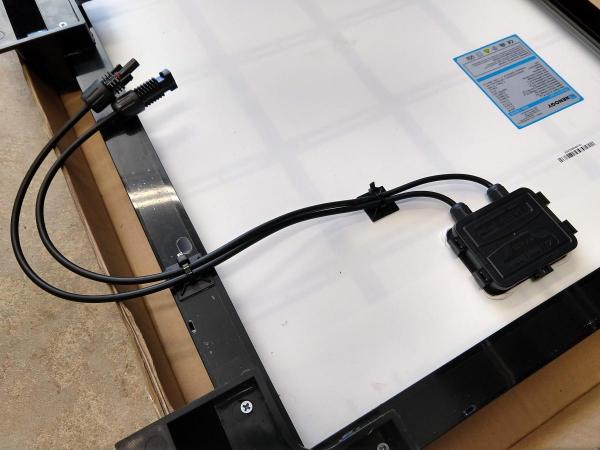 The above picture captures a minor but important to recognize aspect of this task... keeping the wires tamed, keeping strain relief off of the box the wires come out of, and in general keeping the wires where you can get them for later insallation. In hindsight, I should have doubled up on all of these just to ensure that if one fals I've got more coverage. After all, two is one, and one is none.
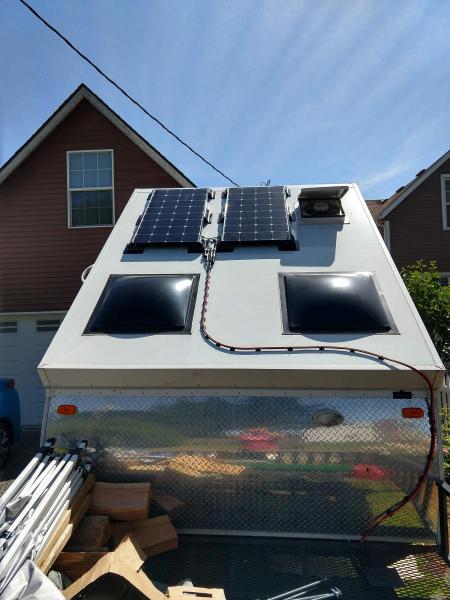
After allowing the Sikaflex to dry for the very lengthy recommended drying period, we've now got panels secured on the roof! More pictures to come shortly of the routing for the solar cable wires, and some discussion on just how much amps the solar panels bring in.
So far, initial tests show that what I got is substantial overkill for the task at hand. The first night after this install was complete I discharged the battery down to 80% capacity. I then went and did something else all day, and returned home to find it fully charged, and this was on a mostly cloudy to partially cloudy day by the end. The second night I discharged the battery to 70% capacity by leaving a bunch of accessories running. By 10:30 am I went out to check on the solar power. The acessories were still on and drawing power, and even with the draw and the solar panels still being mostly in indirect sunlight... the system had fully charged the battery again.
Overkill Acheived!
Phase 4: Add 100 Watts of Portable/External Solar Power
With the fixed solar in place, the internal power upgraded and all that, the next phase was to add portable/external solar power. The operating theory here was that parking in the sun is HOT, so if I can avoid it, I should! I also generally prefer to spend my time in the woods, which also means shade. With that in mind, I generally won't be in direct sunlight, so those 200 watts of solar panels on my roof won't be all that useful. However, a portable solar panel solution will let me run a line out into the sunshine to help keep our battery topped off for when we maybe run the heat at night, or just stay up late with the lights on playing games!
The largest hurdle for me was that the cable provided with the Renogy panel was not only worthlessly short, but it was also a very thin gauge. I also need to take any power and route it inside the camper to the bus bars, so as I am passing through the shunt and thus can monitor the power coming in. The plan I came up with was to attach an ammo box to the front of my camper, and run the wires from the internal bus bars out to the ammo box. The cable could then be wound up in the box, and can be taken out when necessary to attach to the external antenna Here's how it all came out:
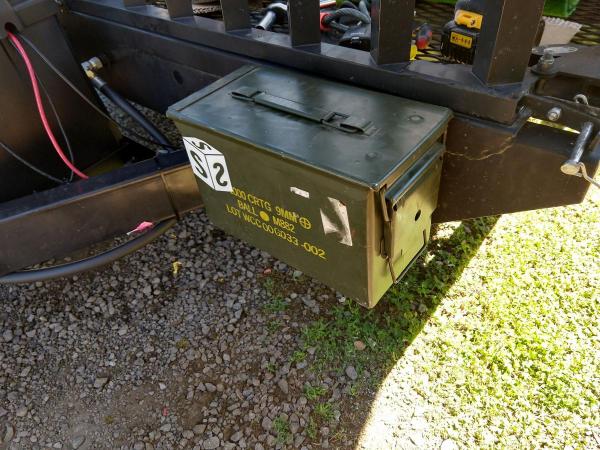
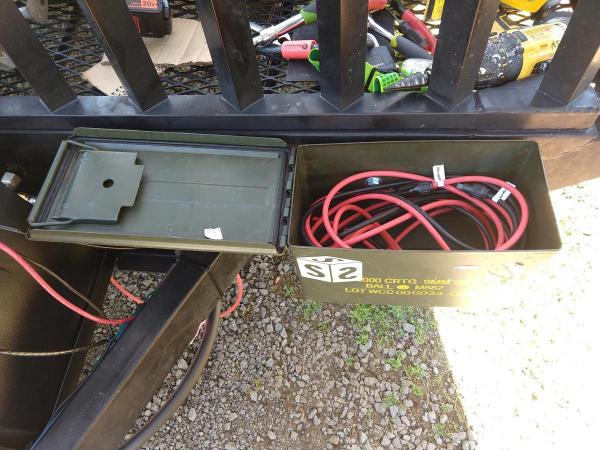
So there you have it. An external storage container for holding the cables, allowing me to just pop it open, run the cabling out to the external portable solar power, and I'm in business.
More information to come on actual power coming in, effectiveness, how it gets used while I'm out and about, etc etc.
Phase 5: Weboost Cell Signal Boosting.
So a big part of working remote is being able to get data. I've done some initial testing on tethering my phone, and thus far it's promising. Between myself and my fiance, weve got data on all of the major networks. I'm also looking into adding a Verizon Jetpack which has a connection for external antennas, but that's not the point of this section. This section is about being able to boost the signal I get in some of the more remote locations I like to frequent.
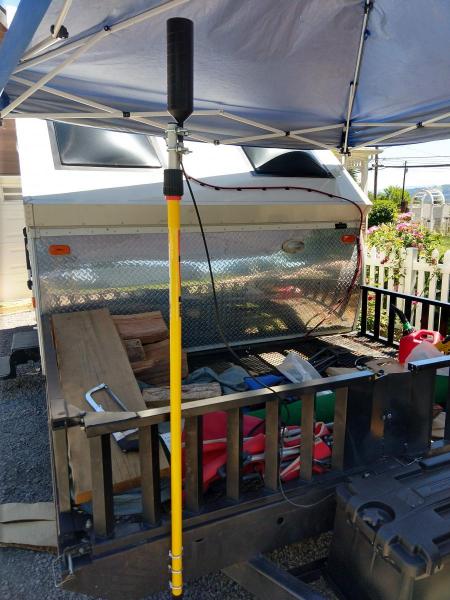
Following in the foot steps of the external portable solar, the plan is to run cabling from the router inside, into the waterproof box. From there, whenever I setup in a location, I will open the ammo box, remove the cabling, route it to the cell signal booster, and then I'm in business! I purchased a 4 foot to 8 foot painters pole for the task, and affix it with U-bolts. I then affixed the provided WeBoost OTR antenna to the extendable part of the pole, as seen in the picture below.
I have some wiring modifications to make at this time in order for this system to work. More information to come as soon as I figure them all out. In the meantime
Phase 6: Find out just how remote working remote actually can be!
This will be updated upon completion of all other tests.